Tag Archive for: video

Jayztwocents Goes Open Benchtable BC1 V2: A Must-See Video for Fans

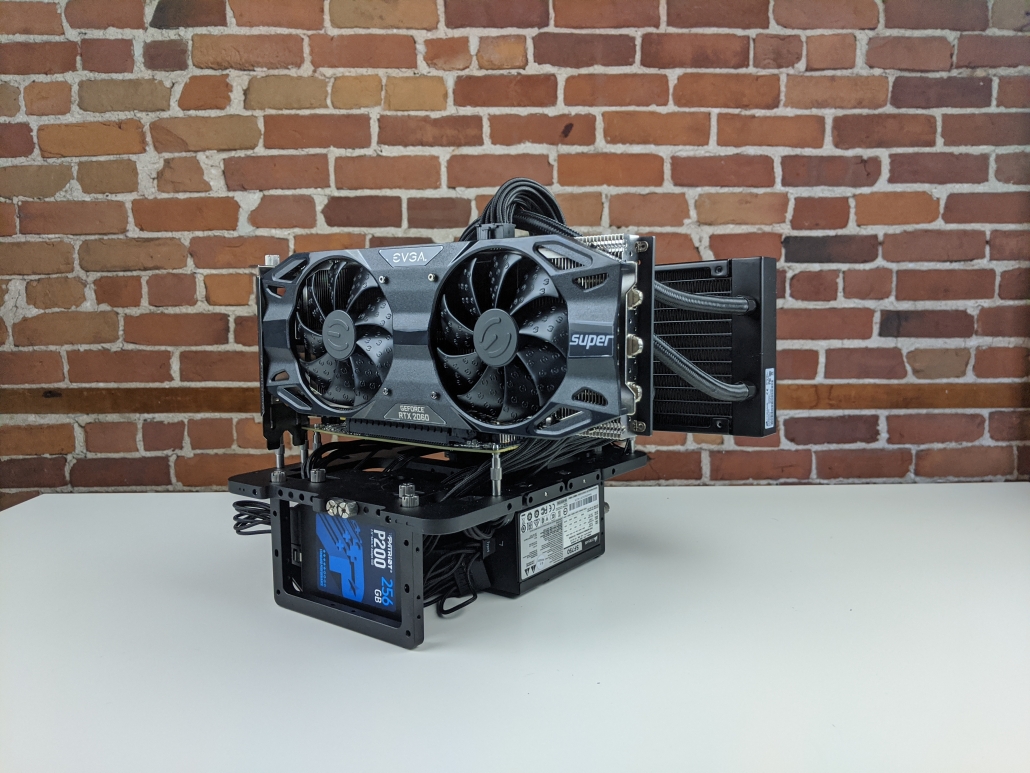
The Open Benchtable team is thrilled to share a must-see video by top tech-tuber Jayztwocents. In the video, Jayz details his experience with the Open Benchtable BC1 V2, from purchasing to installation. The video showcases the benchtable in all its glory and provides a glowing review.

We want to take this opportunity to extend our heartfelt thanks to the Jayztwocents and his team for their support and kind words. Seeing our products receive such positive feedback is incredibly gratifying, and we couldn’t be more grateful.

We would also like to thank all our customers who have purchased the product following Jayz’s review. We appreciate your business and are thrilled that you are enjoying our product. As a result of the surge in sales, our stock levels are now lower than expected. We have a fresh batch of Open Benchtable V2’s coming soon, so we don’t expect to run out of stock entirely.

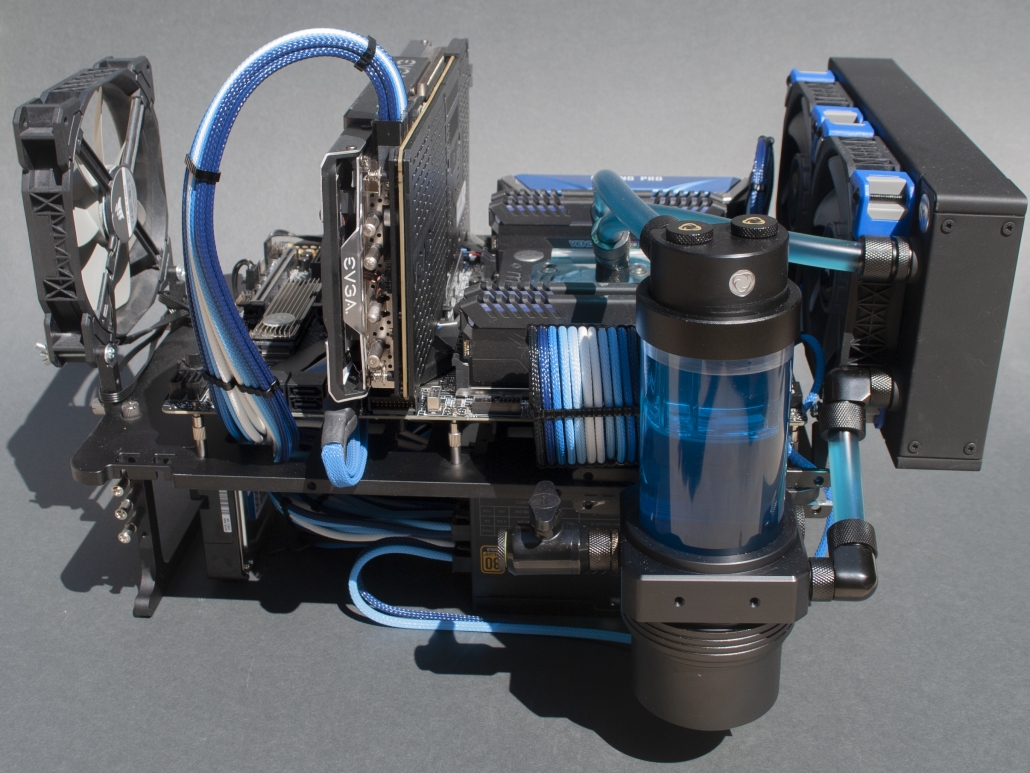
We also want to remind our customers that the Open Benchtable project is a community-driven collaboration that started in 2015 between HWBOT, Overclocking-TV, and Streacom. Our mission was to create a genuinely exceptional benchtable that redefines the product category and towers above any other offerings in terms of portability, aesthetics, quality, and design. The product is also available in retail channels as the Streacom BC1. The only difference between the BC1 and OBT is that the Open Benchtable ships with a travel sleeve and is exclusively available from our website.

Thank you again to Jayztwocents and our valued customers for your support, and we look forward to bringing you more quality.

Check out the video below.

Motherboard mounting guide for Open Benchtable and OBT Mini

This is part of our series of how-to & guide about the Open Benchtable and the Open Benchtable Mini. Today we focus on mounting a motherboard on your Open Benchable.

Getting ready

The Open Benchtable is compatible with pretty much all the common form-factors: Mini-ITX, Micro-ATX, ATX, E-ATX and XL-ATX.

The Open Benchtable Mini is compatible with the Mini-ITX (and some Mini-DTX) form factor.

To start, get the number of stand-off that you need from their storage location. ATX & Micro-ATX form factor requires up-to nine and Mini-ITX requires four.

As mentioned in our mounting guides, there are two types of stand-offs and they can be mixed. Half of them are push-pin standoff while the other half is made of screw standoffs (these are similar to the conventional standoffs you find in most cases). All of the standoffs are stored in the feet of your OBT.

If you are using screw standoffs, get the same amount of M3 screws off, there are located on the right of your OBT.

Tips from the team: we usually go for one conventional standoff in the center and push-pins for all of the others! (you can mix push-pin and screw-standoffs that you feel comfortable with).

Motherboard Mounting

Once you’re all set up, install your standoff so they align with your motherboard (green locations).

If you are using conventional standoffs, tighten your M3 screws in them to secure the motherboard.

Usign the Open Benchtable Mini is even easier, you only need 4 standoffs

Let us know on Social Media what is your favorite mounting strategy: Push-pins only or Mixed ?

Fan mounting guide – OBT & OBT Mini

Even if the OBT is easy to build, sometimes we just want to check how things should be worked out. Today we focus on installing fans on your Open Benchtable.

Getting ready

To mount your fan, you will need to detach four M3 screws, two brackets and optionnally two washers.

In the middle of your OBT, you fill find your brackets, they are attached with one M3 screw each. Unscrew these to get the brackets off. Washers are securely held with the PCI-E thumbscrews, unscrew the nuts and you will find your washers! You can then find two more M3 screws on the right side of your OBT or in your OBT Screw Kit.

Tip from the team: Washers are optional, they are here to prevent any friction between the two aluminum parts which can leave esthetic marks.

Installation

While fans all have the same mouting point & dimension, not all fans are created equal. Thus we outline the two common way to mount your fans to the brackets.

Case 1: Your fan can fit a screw through its mount

This is the easiest case! First, pass a M3 screw through the corner of your fan. Next, screw it the middle hole of the bracket. Finally, use your spare M3 screws to secure the brackets to the holes which are located on the edge of your Open Benchtable.

Tip from the team: The bracket has two different thicknesses on it to accomodate most configurations possible. Play with the brackets to find the best fitting position.

Case 2: Your fan can’t fit a screw through its mounts

There are two ways to tackle it. You can use third party screws and nuts or use third party extra long M3 screws.

Using screws and nuts

When using screws and nuts, pass the screws through your fan’s mounting point and bracket, then tighten the nuts. Finally, use M3 screws to attach the brackets in the holes located on the edge of the Open Benchtable.

Using extra-long M3 screws

When using extra long M3 screws, pass them through the fan’s mounting points. Next, use the middle hole of the bracket as a nut to attach the screw in it. Finally, use your OBT M3 thumbscrews to secure the brackets to the edge of your OBT.

Connect!

Finish by connecting your fan to your motherboard or fan controller.

Theses are awesomes builds by the community to inspire you.

This conclude our fan assembly guide.

Feel free to share your builds with us!

Storage mounting guide

Even if the OBT is easy to build, sometimes we just want to check how things should be worked out. Today we focus on mounting storage on your OBT.

Getting ready

First, make sure your storage is supported on your OBT model.
The BC1 supports 2.5″ and 3.5″ drives whereas the OBT Mini support 2.5″ drives. What’s not different is that you can attach two drives on each model.

Mounting the drive

Unscrew two M3 screws of you OBT.There are located on the top right corner of the BC1. Concerning the OBT Mini, there are securely held on at the bottom right of the structure.

At the bottom of your OBT are four hard drive slots, align your drive under two of these holes and tighten the M3 screws in your drive’s threads.

Tips from the team: Attach your drive so that its connectors are on the same side that your motherboard’s SATA ports, it will make cabling easier!

Open Benchtable Unboxing and PC Build Guide

Yesterday, Trouffman (Isaïe) streamed a PC build guide using the Open Benchtable for over four hours: from Open Benchtable in the box to fully assembled system. Isaïe is a founding member of the Open Benchtable project and regular host of the Web-TV OverClocking-TV. He said it’s been a while since he wanted to do a stream to show how to build a system using the Open Benchtable as a solid foundation. He received three (3!) tables last week and in the excitement of receiving the final product, he scheduled a stream.

Open Benchtable PC Build Guide by Trouffman

During the four hours of livestream, Isaïe covered the following topics

  1. History and design story of the Open Benchtable – how the table came to be and what’s the thought process behind some of the design choices.
  2. Unboxing of the Open Benchtable – showing future owners how to unpack the Open Benchtable and get it ready for usage.
  3. A complete PC Build guide with the Open Benchtable – preparing the Open Benchtable for assembly as well as put together a complete system

The stream was live on the OverClocking-TV Twitch channel, but if you missed it there is now a replay available on the YouTube channel.

Don’t have a benchtable yet?

Order your Open Benchtable now! We are producing the table in a limited quantity and It can be ordered now for $149 USD (Community Edition – incl. Open Benchtable + traveler sleeve).

[Video] Open Benchtable, Laser Engraving Process

Here’s an update regarding the first batch of Open Benchtables. We are pleased to tell you that the initial batch are now produced and undergoing the final steps of the production process. Initial orders will be shipped out later this week.

Just to give you some insight into the production process (and a little tease) here’s a video of the final process that the benchtable undergoes – laser engraving. The benchtable first gets cut out using a computer controlled cutting machine known as a CNC machine. Once the separate parts have has been produced  the product then undergoes finishing. First its sandblasted to give it a kind of grainy finish,  then the surface is then oxidized to give it the final color.  This process also hardens the surface to make it less prone to scratching and damage. Finally we come to the laser engraving stage. It’s at this point that the unique serial number is added as well as the OBT logo. All that remains after the engraving is a final quality check and packaging. Check out the video below which gives you a close up view of the engraving process.


If you are interested to learn more about the production process as well insight into the design and development of the Open Benchtable, we can recommend this video and article where lead developer Timothee interviews Shimon, head of design and manufacturing at Streacom.

We are taking orders!

Right now the Open Benchtable is being manufactured in limited batches. It can be ordered now for $149 USD (Community Edition – incl. Open Benchtable + traveler sleeve). The deliveries are to be expected before the end of September.

Open Benchtable – The 3D Promo Video

When you’re launching a new product it’s always great to have lots of luscious pics of it – ones that look absolutely stunning. With the renderings and live pics we’ve published recently, I’m sure you’ll agree that we nailed that aspect of the launch. However as well pictures we also commissioned a 3D promo video to show exactly how the Open Benchtable works.

Today we are happy to say that the video is now complete, and wow… does it look good! It shows how the legs, brackets, screw and supports fit into the overall sleek design, building up a full ATX system that includes an all-in-one cooled GPU and CPU. Enjoy!

You can also find the Open Benchtable promo video here.

We are taking orders!

Right now the Open Benchtable is being manufactured in limited batches. It can be ordered now for $149 USD (Community Edition – incl. Open Benchtable + traveler sleeve). The deliveries are to be expected before the end of September.

Open BenchTable – Official prototype launch / Show-off

Trouffman and Xyala from OverClocking-TV unveil the first prototype of the open benchtable to the HWBOT World Tour 2016 livestream audience at the Gamers Assembly 2016 in Poitier, France.

source: overclocking-tv.com