OBT XOC Insulation Foam Development Story
In this blog post we share the behind-the-scenes development story of the OBT XOC Insulation Foam.
The idea for the OBT XOC Insulation Foam has been brewing for many years, dating back to the 2016 launch of the OBT Community Edition. Our intention was to provide extreme overclockers with an easy way to create a clean, well-insulated system.
From Idea to Concept
One of the initial drivers of the Open Benchtable project was to support extreme overclockers (XOC) with an easy to transport and easy-to-use benchtable. An assumed goal was also to make extreme overclocking sexier and ensure demo systems will look great during competitions and bench-parties (at least much better than the standard cardboard motherboard box). This could help drive more interest to the XOC field and make it more appealing for promotional purposes.
Using the Open Benchtable to quickly mount/dismount an XOC rig quickly got adopted in the community. However, the aesthetics were not always up to scratch, mostly due to the required insulation work. So, we set out to create a “simple” insulation foam that would make it easy to create a clean-looking setup. Here are the basic requirements:
- Be a perfect fit on the Open Benchtable
- Compatible with backplate mounting on all or at least the major platforms
- Make Extreme Overclockers’ life easier
- Use proved & trusted materials
- Must be re-usable! (create less trash, reduce environmental impact)
- Do not re-invent the wheel
In the next couple of segments, we’ll have a closer look at how we addressed each of these requirements and how our solutions evolved over time. Needless to say, this product has been in the works for a lot longer than we anticipated.
Creating the Perfect Fit
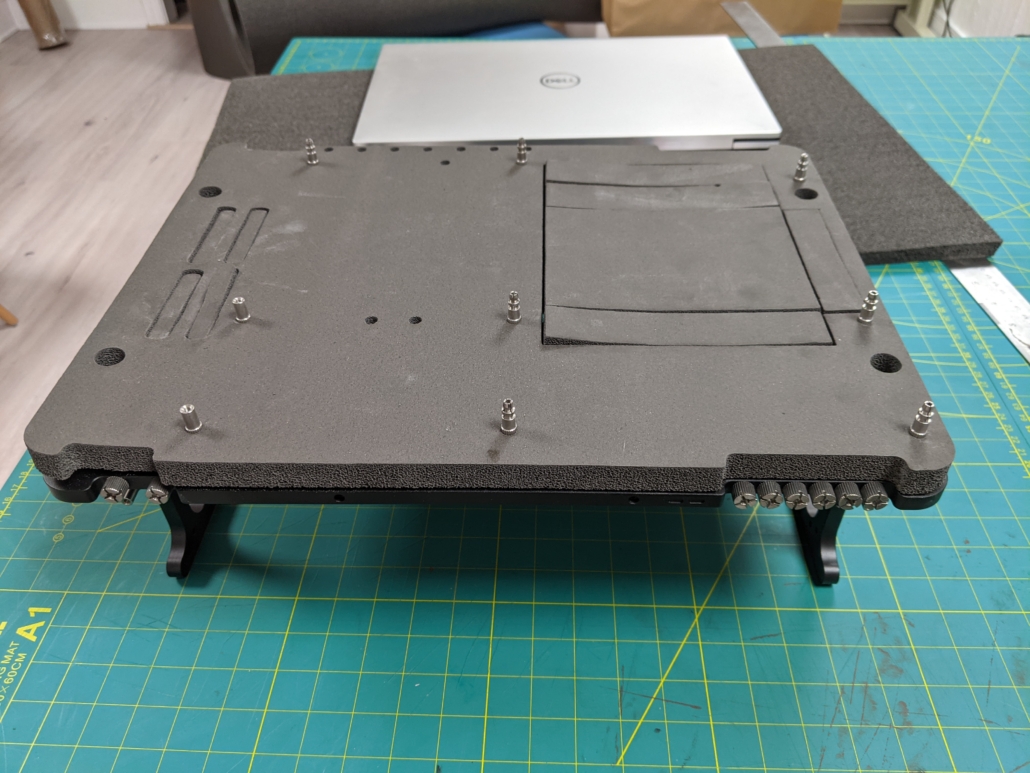
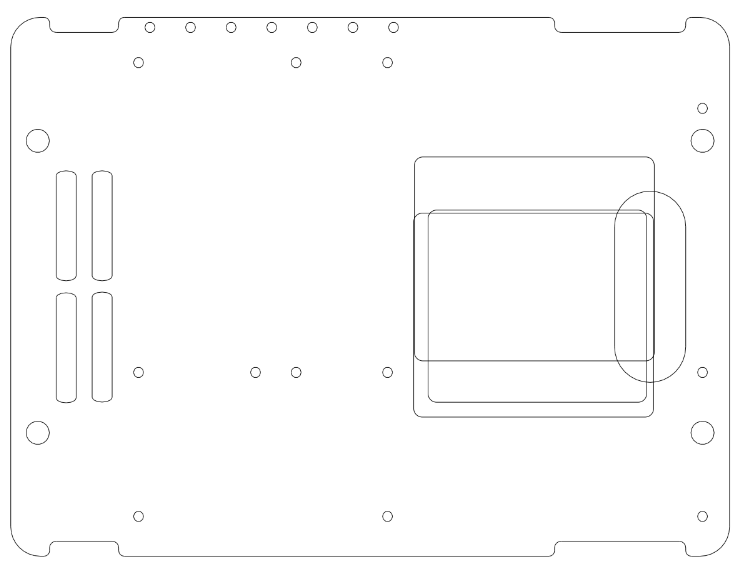
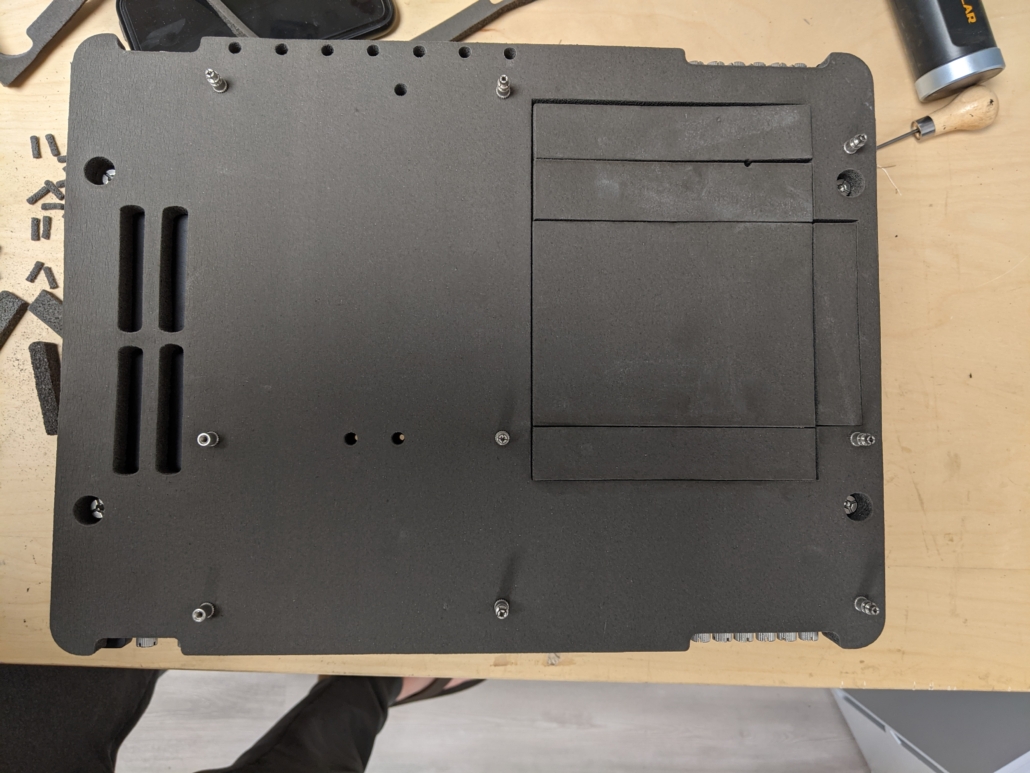
The first iteration of the foam design included nothing more than a mere cut-out of the Open Benchtable V1 shape.
A key requirement was to follow the shape of the Open Benchtable. At first, we considered what would be required in terms of backplate placement. At this point it seemed a great and “easy” idea to implement… however that’s almost never the case.
In April 2018 we released a minor update to the Open Benchtable, dubbed v1.1. This introduced a couple of small design and layout changes to the table design, but fortunately none were incompatible with our insulation foam design.
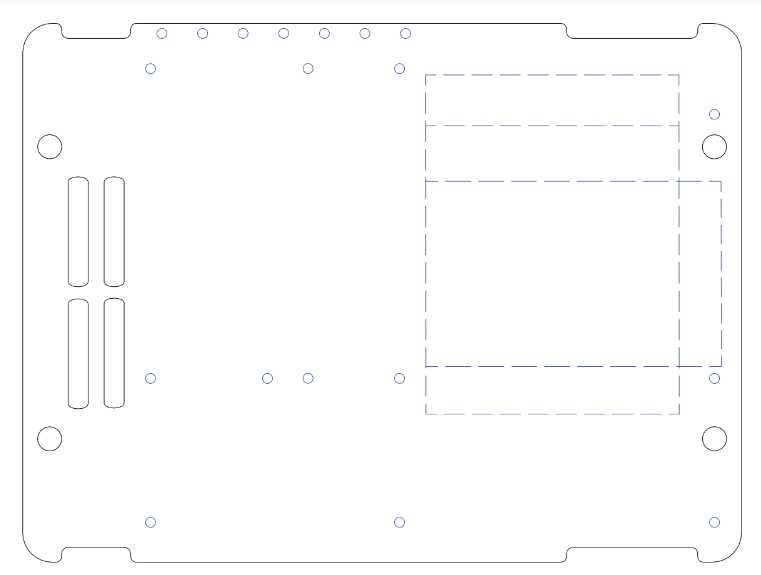
The iterations of the insulation foam design were mostly focused on backplate cut-out positioning and other possible conflicting areas. At this moment, in April 2018, we had gone through five iterations already on the OBT XOC insulation foam. Our biggest challenge was to make a “one-size-fits-all” backplate pre-cut-out area.
Backplates & Sockets
Between April 2018 and June 2021, we spent most of our time on researching materials and adding new CPU socket placement to the compatibility list. Supporting all popular CPU socket position and CPU LN2 container backplate (traditional & heated) was a lot more time-intensive than anticipated because of documentation challenges.
The goal was to map the CPU socket position on the most-used motherboard on Hwbot.org ranking, supporting most of the older socket and the newly released sockets for multiple vendors. But remember that our project started back in 2017, and AMD released AM4 only in March 2017, Intel released LGA2066 in June 2017.
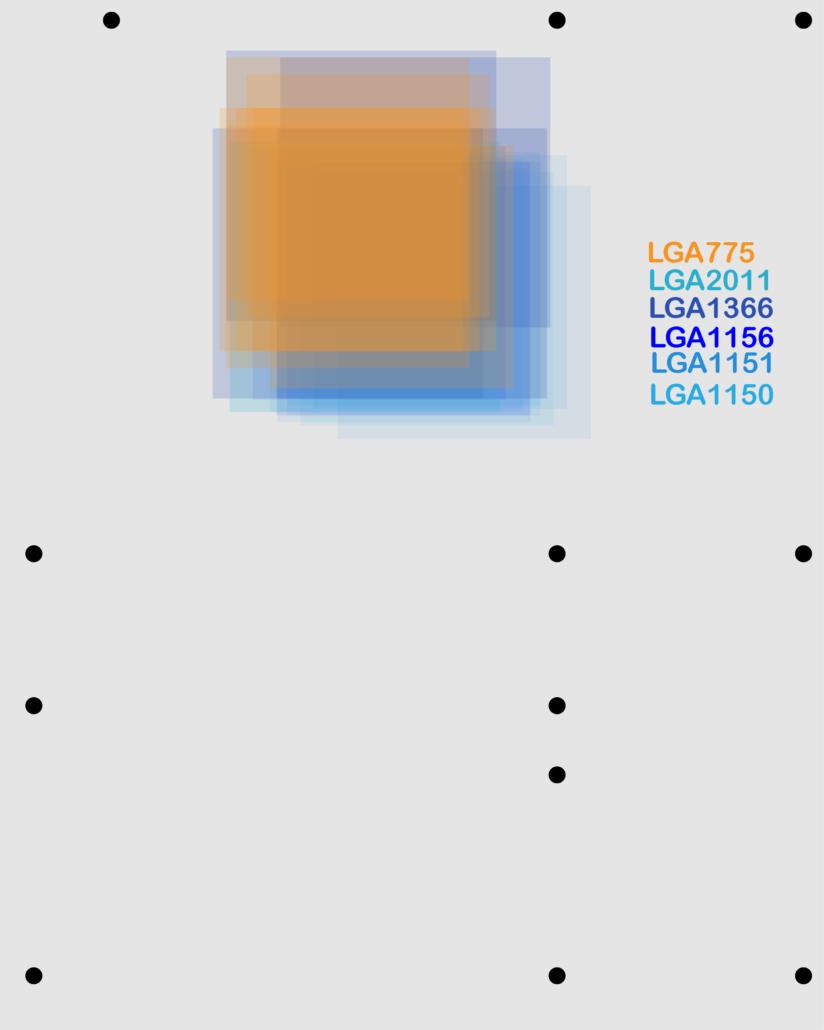

While most of the detailed schematics were unavailable online, we started mapping out the socket position from official pictures and the (few) available datasheets. Once the mapping was done, finding the proper cut-out was a game of “who is left behind”…
100 Overclockers, 101 Insulation Material Preferences
Extreme overclockers are opinionated, especially when it comes to their favorite tools. That includes the choice of thermal paste, LN2 cooling pots, and also insulation materials.
Over the many years we’ve been around the extreme overclocking community, people have gone back and forth on what’s the “ideal solution.” Suggested solutions include vaseline (and loads of it), kneaded eraser, thick paper towel, or plastic spray. For this project, we opted for the “foam” option as it’s better for re-usability, looks cleaner, and be a trusted/proven material.

The typical insulation foam used by extreme overclockers is known as “Armaflex,” which is a brand name by Armacell. This insulation foam is described as “high-performance, fiber-free, closed-cell elastomeric foam insulation” and is specifically designed for HVAC, plumbing, and refrigeration applications.
At this point we looked out to search and find the correct thickness for our “Neoprene foam.” We set our course on using 1/2″ and 1″ foam thickness as this fits the exact “working height clearance” of the Open Benchtable motherboard standoffs.
Sounds easy enough? Well… Not quite much!
Foam Cutting Technology
The tricky part is cutting the foam in a neat, repeatable way. To make a long story short: the only solutions to get this done properly is by using laser cutting, water jet cutting, or regular cutting.
- Regular cutting relies on using a knife or machine cutter to cut the shapes out of the foam. We quickly dismissed this option as only the outside of the foam could be cut to specs on the 1/2″ thickness. Furthermore, the precision of the cutting is not good enough for smaller segments.
- Laser cutting is widely available and a precise enough methodology for this project. Plus, we also rely on this process for engraving the Open Benchtable. However, unfortunately, not all materials allow for laser cutting due to the risk of fire or release of hazardous gases.
- Water jet cutting relies on a high-pressure water stream to cut through material.
Let’s have a closer look at those last two technologies.
Laser Cutting
Neoprene is part of the family of synthetic rubbers, and long story-short: it cannot be used on a laser cutter for couple reasons, one being that it emits toxic smoke when burned, and that smoke can also damage the laser-cutting equipment.
We started our search again for a “laser-cutting” compliant “neoprene-like” insulation foam that exists in “sheet” and can be found in 1/2″ & 1″ thickness.
Luckily enough Armacell (manufacturer of Armaflex) produce this very specific type of insulation material, it is magnitude more expensive and more difficult to obtain, but it exists.
After a while we manage to get the exact type of material we need to use on the laser-cutter called NH Armaflex. This material is chlorine, bromines and PVC-free: all we need to use the laser-cutter for our prototype.
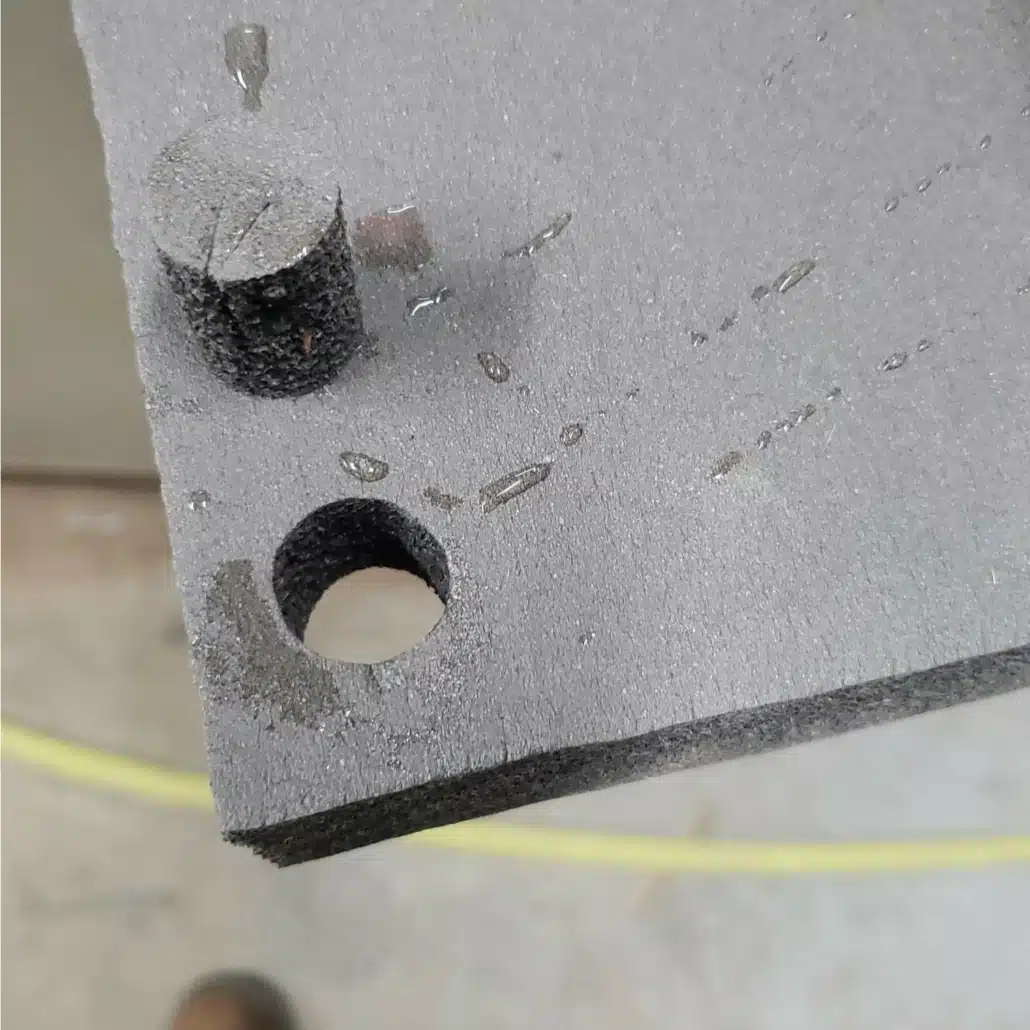
The first prototype on a laser-cutter needed some adjustments to find the correct settings of speed and power to cut-through the foam without burning it.
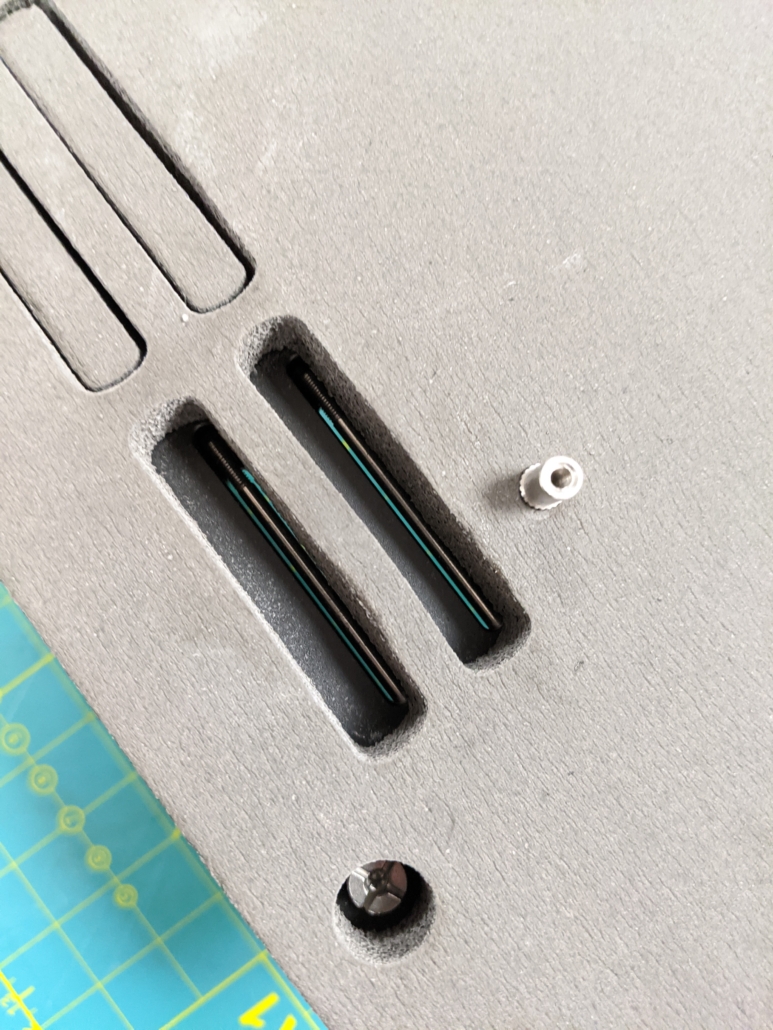
The outside cut path is clean enough, but the smaller parts are harder to get right. The CPU backplate will need more work too. At first, we were expecting the density of the material to expand a bit after the cut and hold the pieces in place, this did not work as expected. That CPU backplate area will be re-designed later.
We had some challenges to produce clean-cut reliably on the 1/2″ thickness and that could only get worse with the 1″ thickness.
That could still be a potential option for production if we can find a place to get it done at scale and source the material (NH Armaflex) close to that production facility.
At that time we were already working on the Open Benchtable V2 and knew about the slight changes in positions of some elements. The cut-out elements for the storage-area on the OBT will move slightly as part of the V2: at this point, we revised the design of the insulation foam project and decided that the bottom part of the foam could be removed completely.
This would ultimately simplify the cutting process and make it easier to use for compatibility reasons.
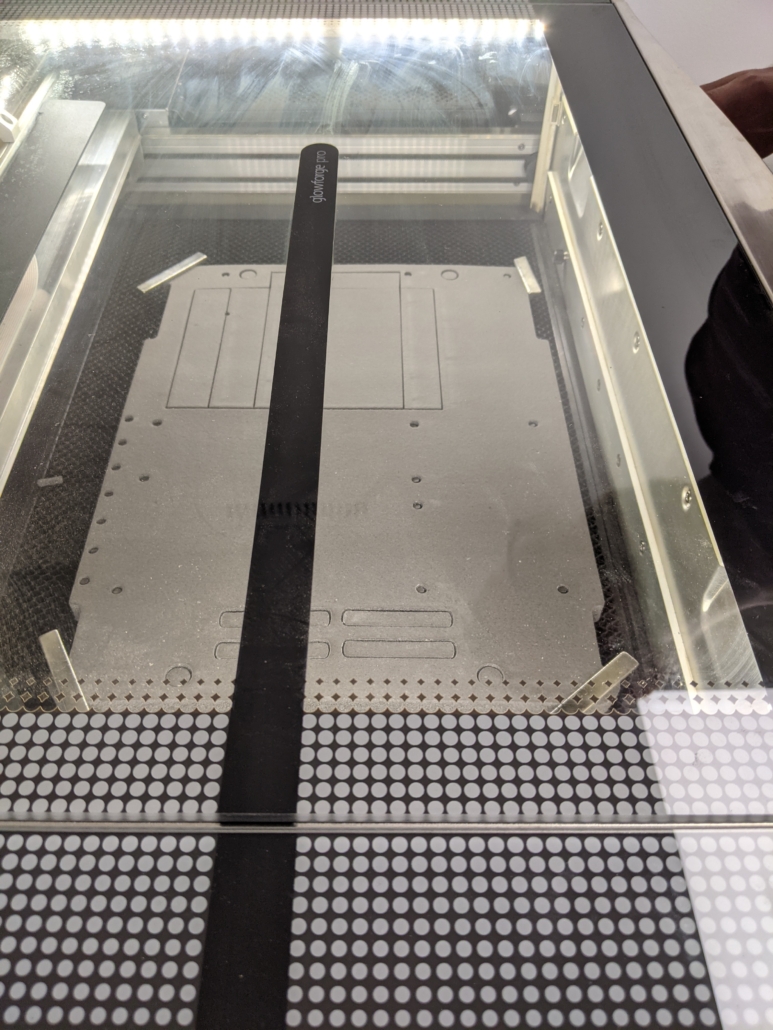
Water Jet Cutting
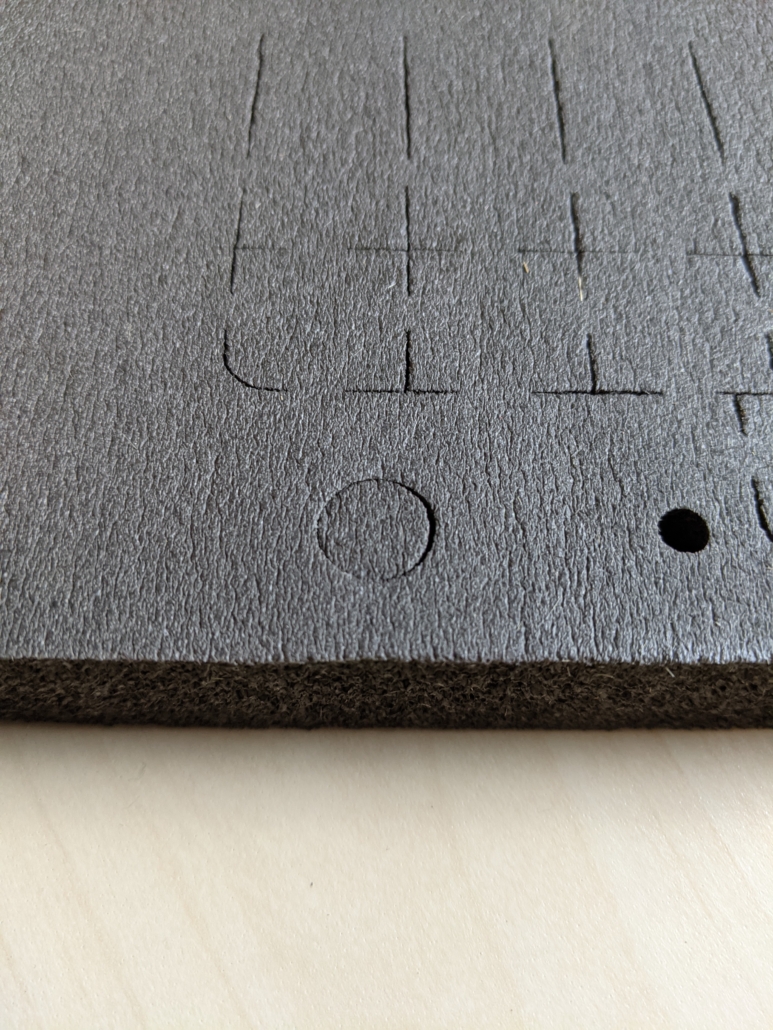
We explored the water jet cutting technology path and it quickly turned out to yield much better results.
Water jet cutting machines are usually industrial-size and scale with production volume. It is generally hard to find a water jet cutting machine or provider that takes orders for small batch production, let alone prototyping. Fortunately, we found a shop willing to let us try out this technology. It was the first time that shop was water jet cutting this material so were curious about the result too.
One of the major downsides of water jet cutting is the humidity because it uses a stream of water. So, obviously, when we received our water jet cut insulation foam, it was pretty wet. So, we need to dry each of the insulation foam separately before we could process it further, something that will have to be managed at scale if we go to full production of this product.
Once dried up the result met our expectations!

The First Production Run
As you might have understood from this blog post, we decided that water jet cutting would be the optimal choice for the first production run of the OBT XOC Insulation Foam.
The initial batch is extremely limited but, based on the interest and feedback, we will consider making a broader production and maybe even turn it into a long-term product.


