November 24, 2022 – To celebrate the annual Black Friday and Cyber Monday shopping season, Open Benchtable is offering customers up to 25% OFF on all Open Benchtable products. The Black Friday discount is applied automatically upon checkout.
-10% OFF on OBT V2 Black & Titanium (link) and OBT V2 Mini (link)
If you want to learn more about the features and specifications of the products, feel free to have a look at the product overview page or the specifications page.
As always, we are grateful for your support and wish you a pleasant Holiday season!
https://openbenchtable.com/wp-content/uploads/2022/11/black-friday-2022_1_11.jpg7201280Pieter-Jan Plaisierhttps://openbenchtable.com/wp-content/uploads/2017/06/logo-if-rd-330-300x107.pngPieter-Jan Plaisier2022-11-24 12:09:442022-11-24 12:09:552022 Black Friday & Cyber Monday Promotion: Up to 25% OFF!
June 13, 2022 – Open Benchtable is delighted to announce that seven spare parts packs, designed to fit all Open Benchtable V2 models, are now available for purchase in our store.
From the beginning of the Open Benchtable project, making moding or replacing pieces easy has always been essential for us.
The Spare Parts Packs are the direct replacement of the Screw Kit for Open Benchtable which we launched in April 2018. In the various Spare Parts Packs for Open Benchtable V2 you can find all the spare parts needed to replace any lost Open Benchtable V2 parts. You can also use the additional accessories to extend your existing system with more mounting options for additional water cooling gear, hard drives, fans, and so on.
There are seven Spare Parts Packs available now, ship worldwide and include:
https://openbenchtable.com/wp-content/uploads/2022/06/SpareParts.jpg582895Pieter-Jan Plaisierhttps://openbenchtable.com/wp-content/uploads/2017/06/logo-if-rd-330-300x107.pngPieter-Jan Plaisier2022-06-14 16:38:292022-06-14 16:45:10Open Benchtable Spare Parts Packs Available Now
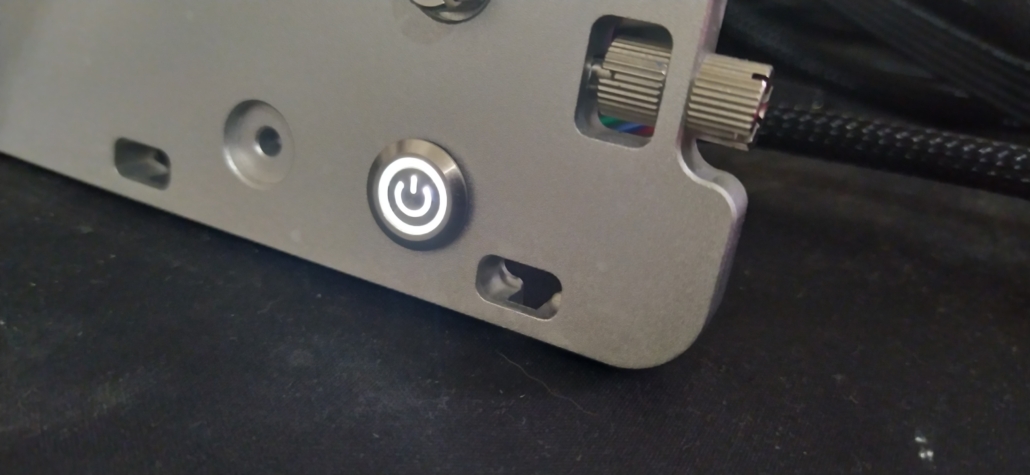
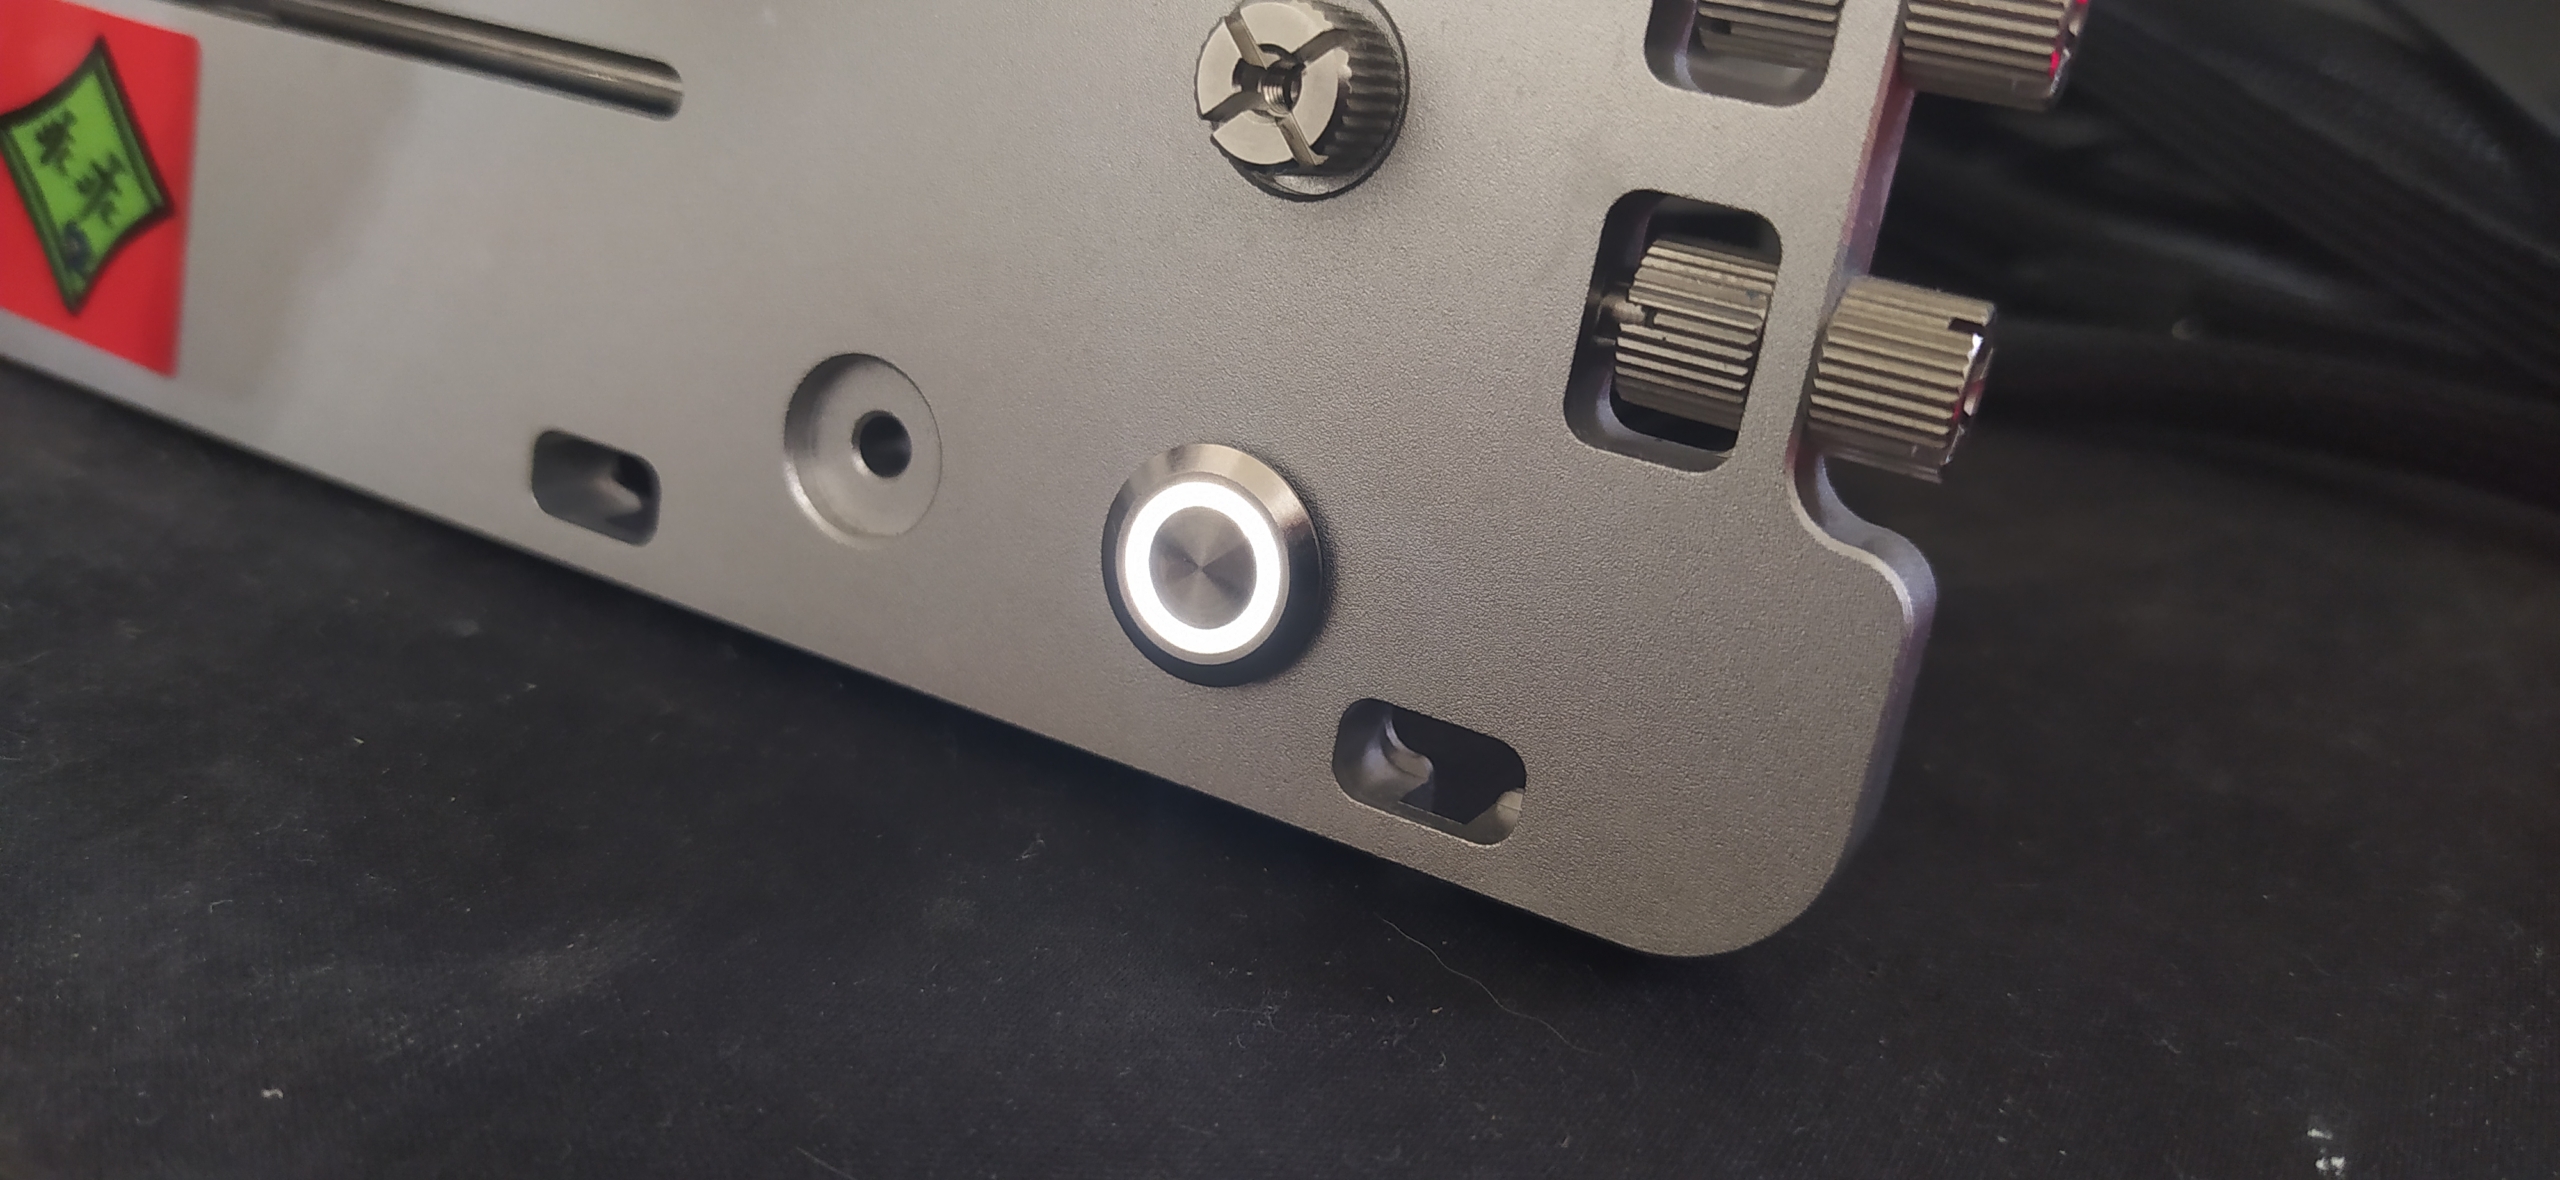
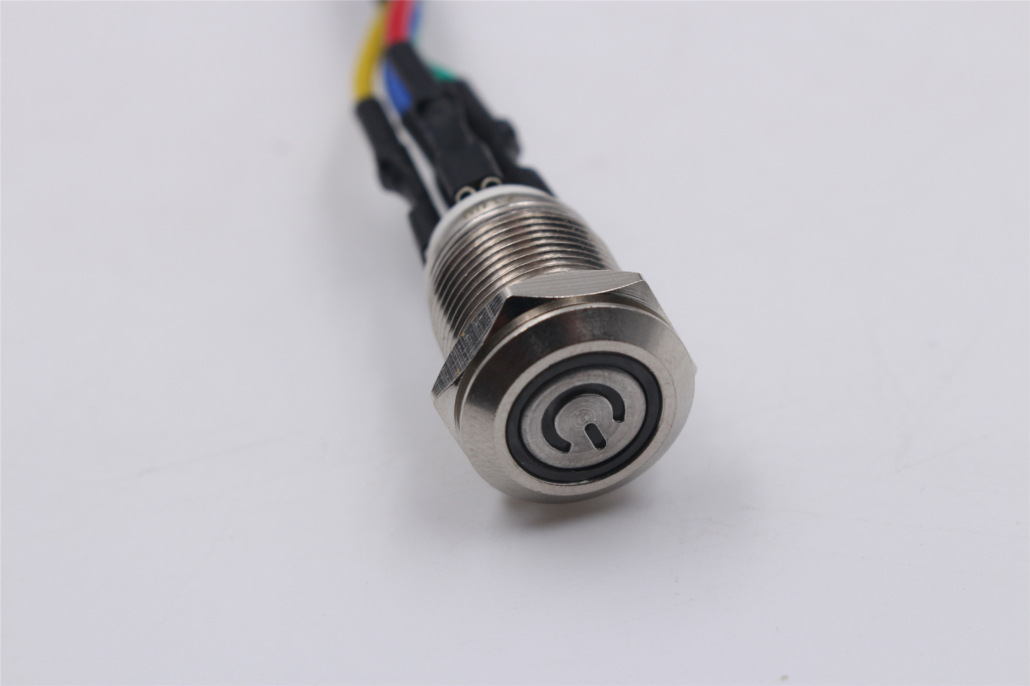
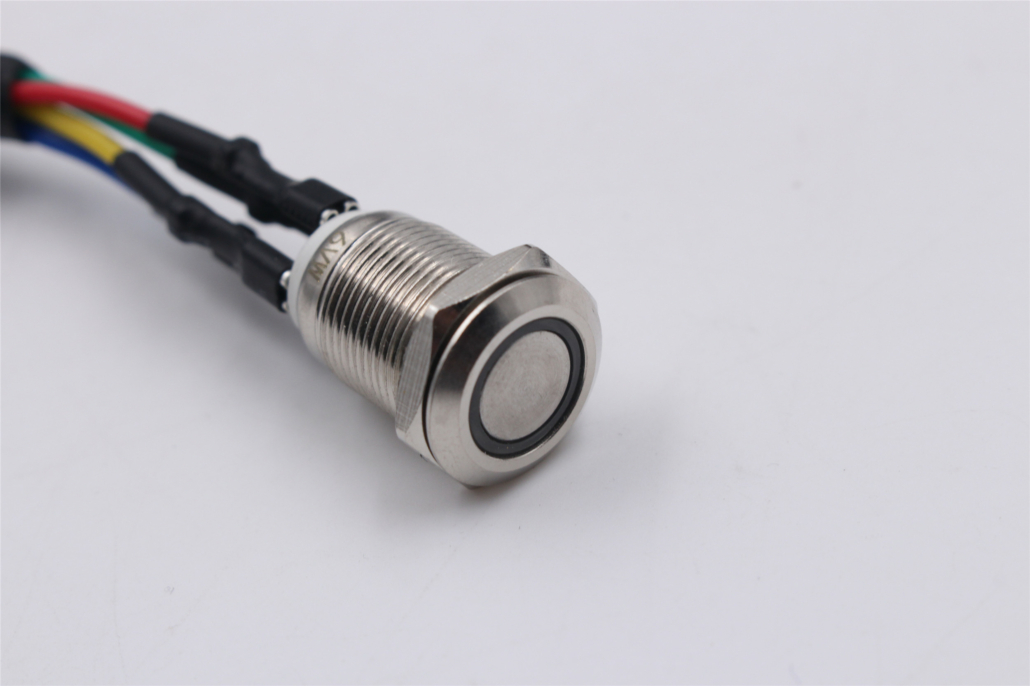
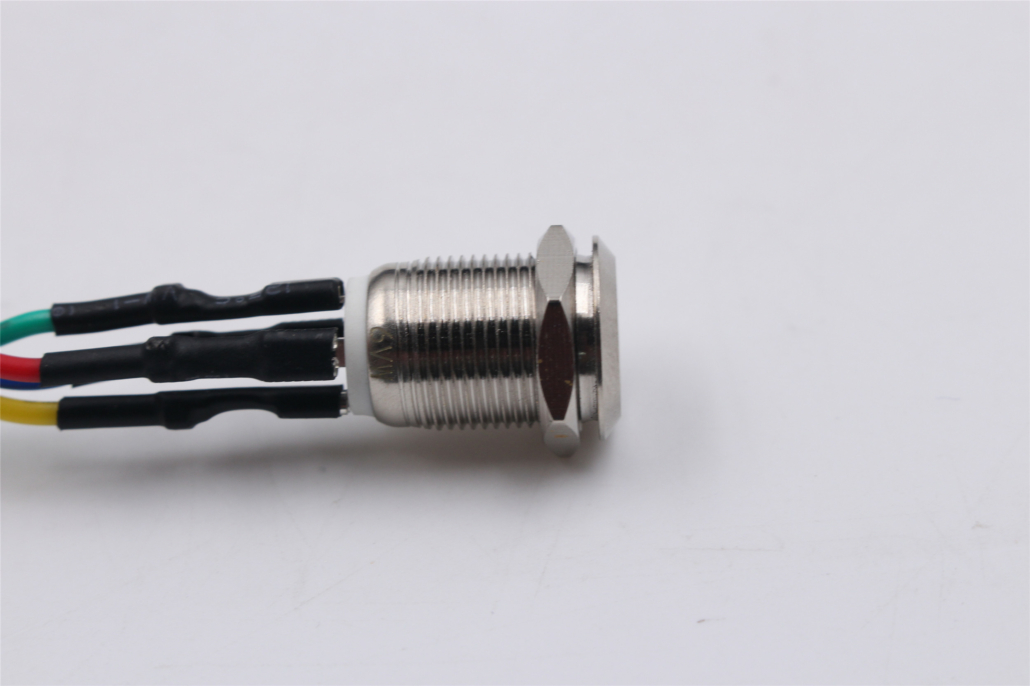
June 3, 2022 – Open Benchtable is delighted to announce that the Power Button and Reset Button, designed to fit all Open Benchtable V2 models, is now available for purchase in our store.
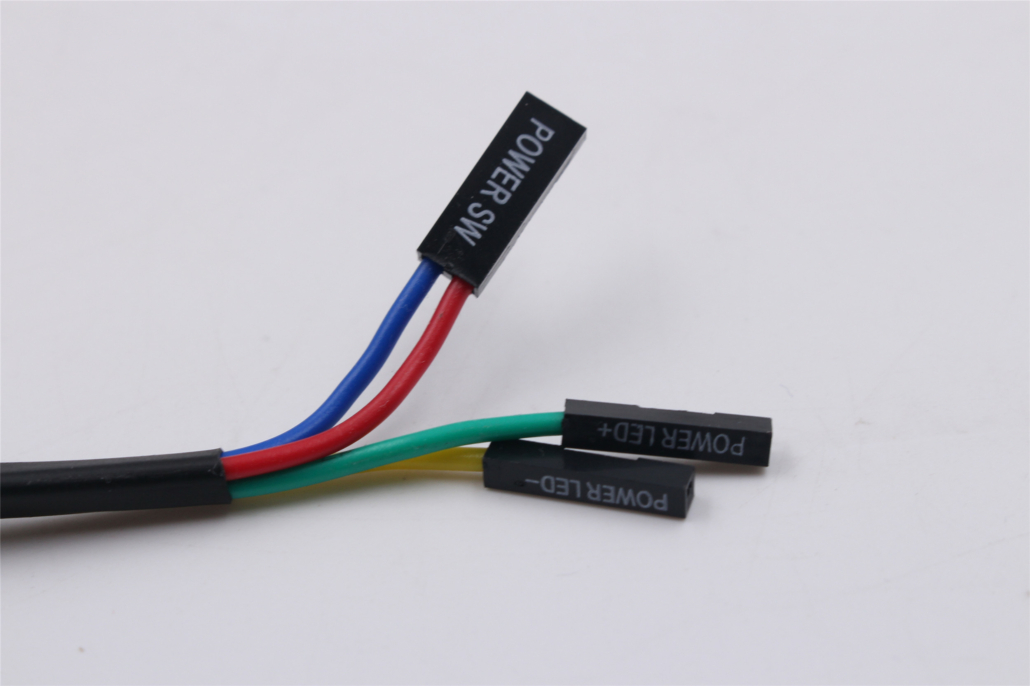
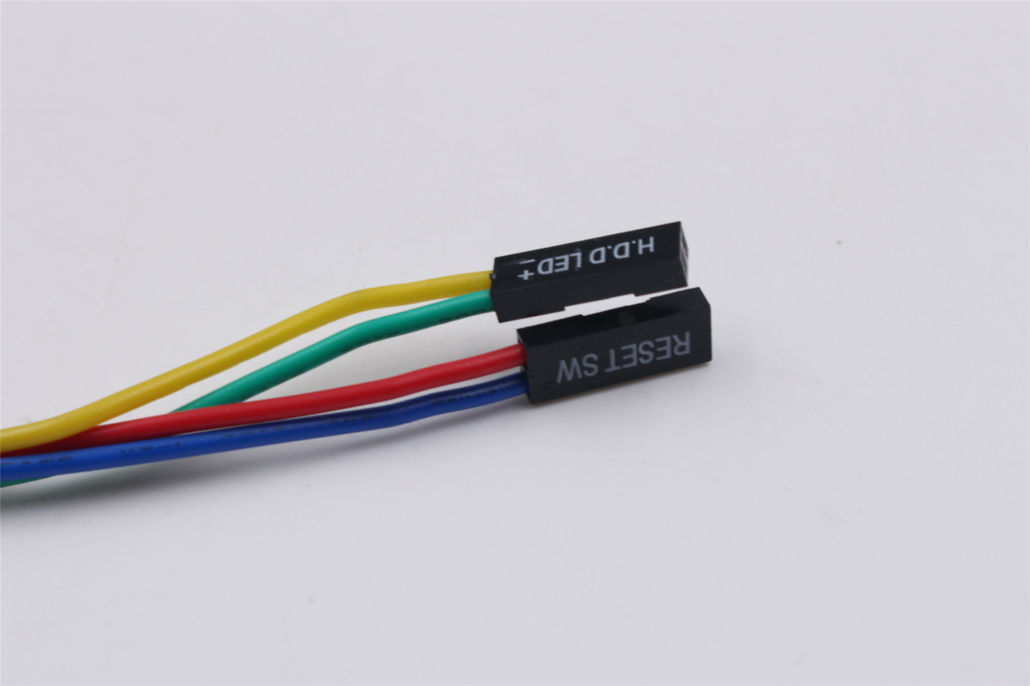
Power button mounting holes is one of the features we introduced on November 3, 2021, when we launched the Open Benchtable V2. It was a feature we were frequently asked about by customers and members of the community. The button mounting holes are located near the bottom at either side of the benchtable and fit a standard electrical switch. Based on customer requests, we now also made available compatible buttons for purchase on our web store. Both buttons come with an embedded white LED, have a black heat shrink cable wrap, and measure 60cm.
Specifications:
Button color: white
Cable color: black
Cable type: heat shrink cable wrap
Cable length: 60cm
Thread length: 12mm
Power button connections: power switch and power LED
Reset button connections: reset switch and HDD LED
The power and reset button are available on our store starting today on our store.
As the Chinese New Year 2022 celebrations are about to get underway, we’d like to inform you about the impact the festivities will have on shipments and order processing.
Our China-based logistic partners will not process orders between January 20 and February 14. The online store and customer support are not affected and will be available throughout the period. Barring any unfortunate circumstances such as a resurgence of the coronavirus, we expect operations to resume gradually after the celebration period. All orders placed during the celebration period will be processed once the logistics team is back in action.
The entire Open Benchtable team wishes you Xīnnián kuàilè (新年快樂) (a happy New Year). May the Year of the Tiger bring great strength and prosperity to you and your families!
The Year of the Tiger will be about making big changes. This will be a year of risk-taking and adventure. We’re finding enthusiasm again, both for ourselves and for others. Everyone is fired up, generosity is at an all-time high and social progress feels possible again.
https://openbenchtable.com/wp-content/uploads/2022/01/Chinese-New-Year-2022.jpg20002000Pieter-Jan Plaisierhttps://openbenchtable.com/wp-content/uploads/2017/06/logo-if-rd-330-300x107.pngPieter-Jan Plaisier2022-01-12 21:07:242022-01-19 23:09:42Chinese New Year 2022 from January 20 to February 14
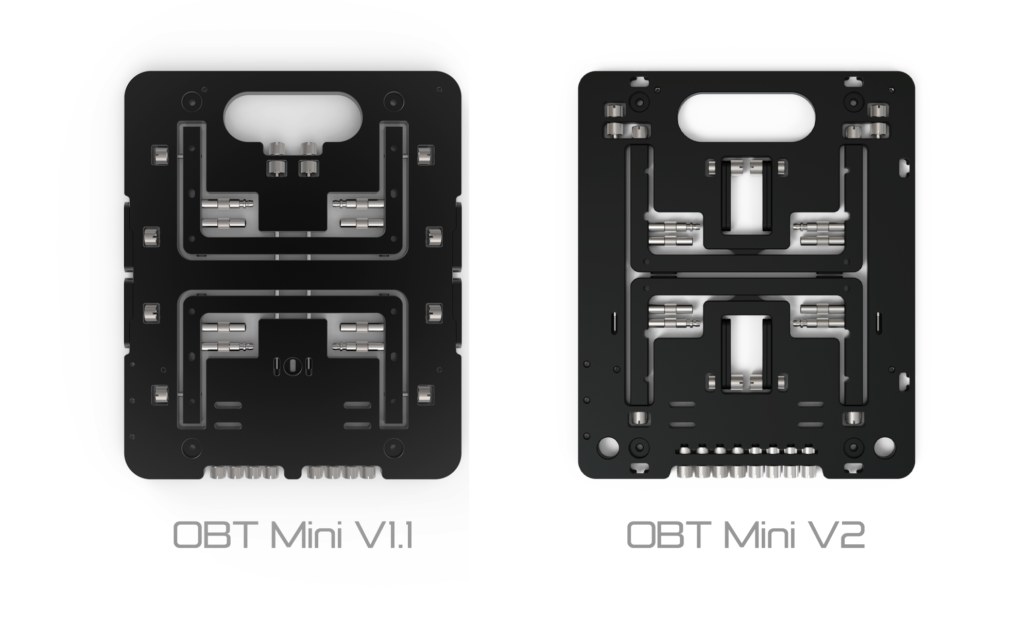
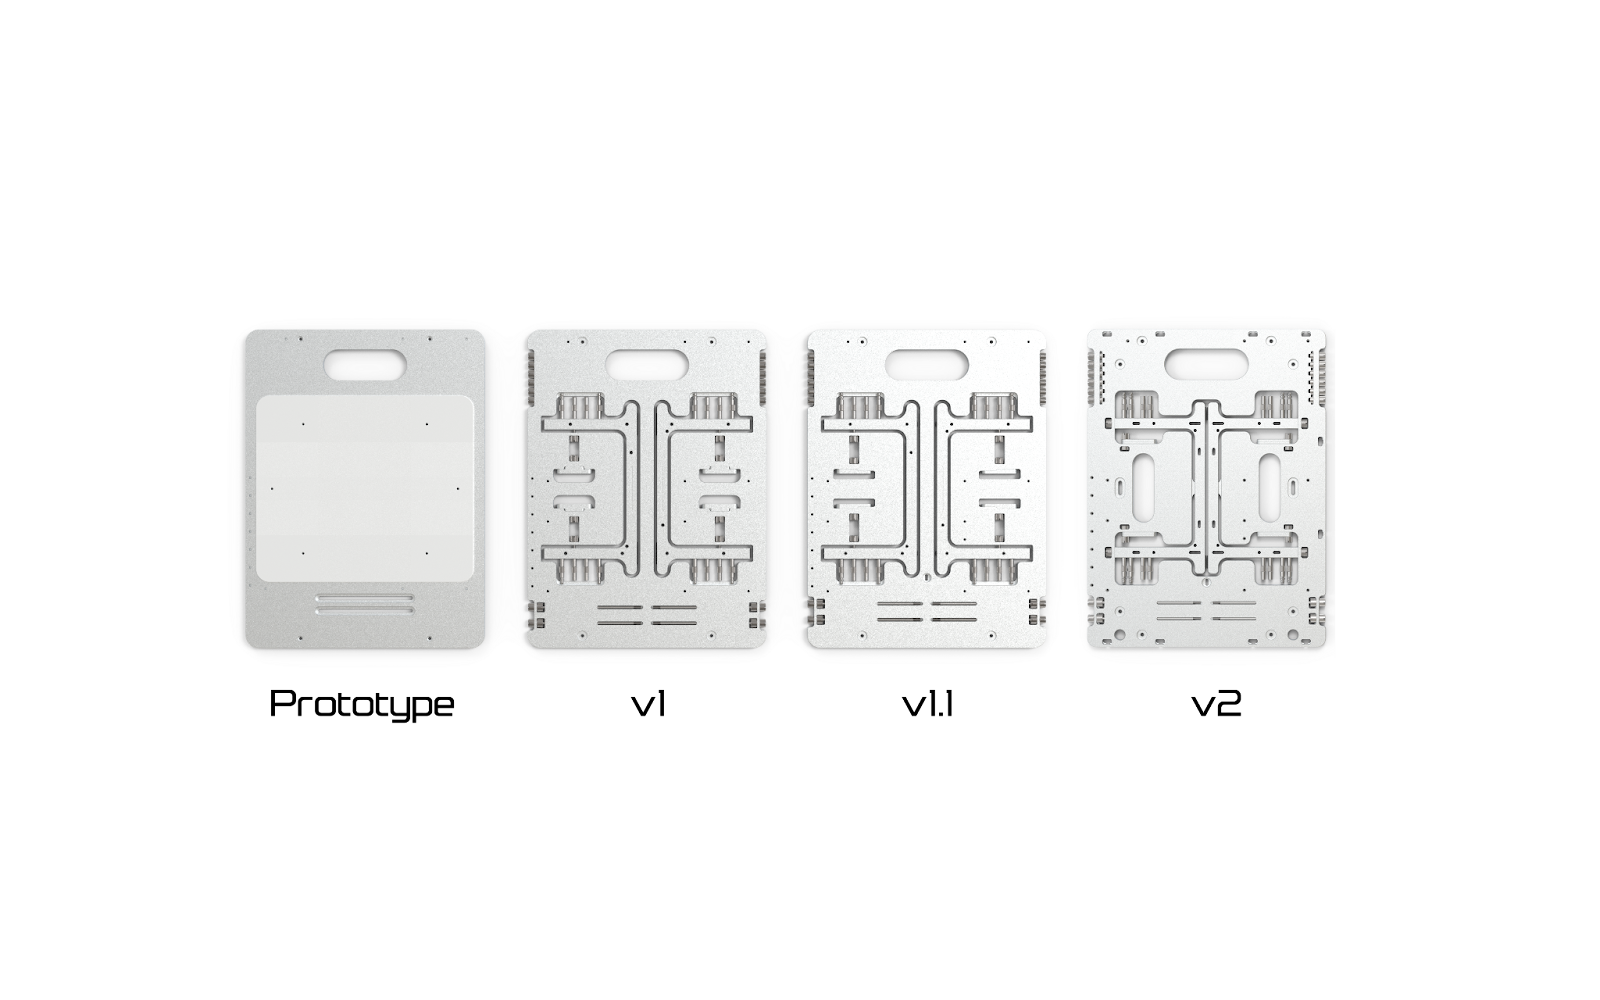
The Open Benchtable BC1 Mini V2 is now available for purchase on the Open Benchtable online store and ready to ship.
January 12, 2022 – Open Benchtable and Streacom are delighted to announce the availability of the Open Benchtable BC1 Mini V2. The Open Benchtable BC1 Mini V2 is the small form factor version of Open Benchtable BC1 V2 launched in November 2021. The V2 features a fresh design that incorporates many of the lessons learned from community feedback gathered over the years.
The Open Benchtable BC1 Mini V2 will replace the existing V1.1 design and comes in 3 colors: Black, Silver, and Titanium.
About Open Benchtable Mini
It’s been quite the Open Benchtable journey from the first conversations in June 2015 at the Computex trade show, over the prototypes tested during the 2016 HWBOT World Tour, to our latest V2 iteration launching in the fourth quarter of 2021. In May 2017, the Open Benchtable family welcomed a new, smaller member: the Open Benchtable Mini.
We are proud to say that during our many interactions with customers, supporters, enthusiasts, PC DIY aficionados, industry partners, and system builders around the world, we have learned so much about everything that makes the Open Benchtable Mini great and all the things we improved based on your suggestions. For Mini V2 we incorporated as much of the feedback as possible to develop the best Open Benchtable to date.
In our admittedly slightly biased opinion, the result is simply spectacular. The new Open Benchtable BC1 Mini V2 is designed to be more robust, simpler, and more practical to use for everyday PC enthusiasts.
Open Benchtable BC1 Mini V2 Product Features
Although the OBT BC1 Mini V2 has undergone a significant re-design, it was important to stay true to the winning formula and maintain design continuity. The footprint, size, look, and construction will feel entirely familiar to current users and the custom screws will still work on all versions
Built To Last
As with every iteration of the Open Benchtable, the Open Benchtable BC1 Mini V2 is built to last.
We have implemented several small design revisions which will help further extend the lifespan of the benchtable itself. We also meticulously evaluated the entire supply chain process to not only incorporate lower-waste processes but also overall reduce the environmental impact of the Open Benchtable production.
The Built To Last attitude doesn’t just apply to the Open Benchtable products; it also applies to our planet. Therefore, Open Benchtable joins our partner Streacom in its commitment to offset the environmental impact by reducing waste from smarter packaging and their partnership with the Eden Reforestation Project.
Upgraded Screws, Re-Designed Brackets, and Enhanced Usability
Since its inception, the Open Benchtable Mini has been using the same nuts and screws. While we’ve kept all of the assembly 100% toolless, this significant upgrade improves the V2 durability and long-term use.
To further improve durability, we removed threads made directly into the side of the benchtable. Not only does the screw+nut design ensure all mounting points on the table are much stronger, but also, replacement, in case of damage to the thread, is now possible. Users that mount heavy hardware or require ultra-tight mount can now apply high torque with tools to securely mount anything to the table.
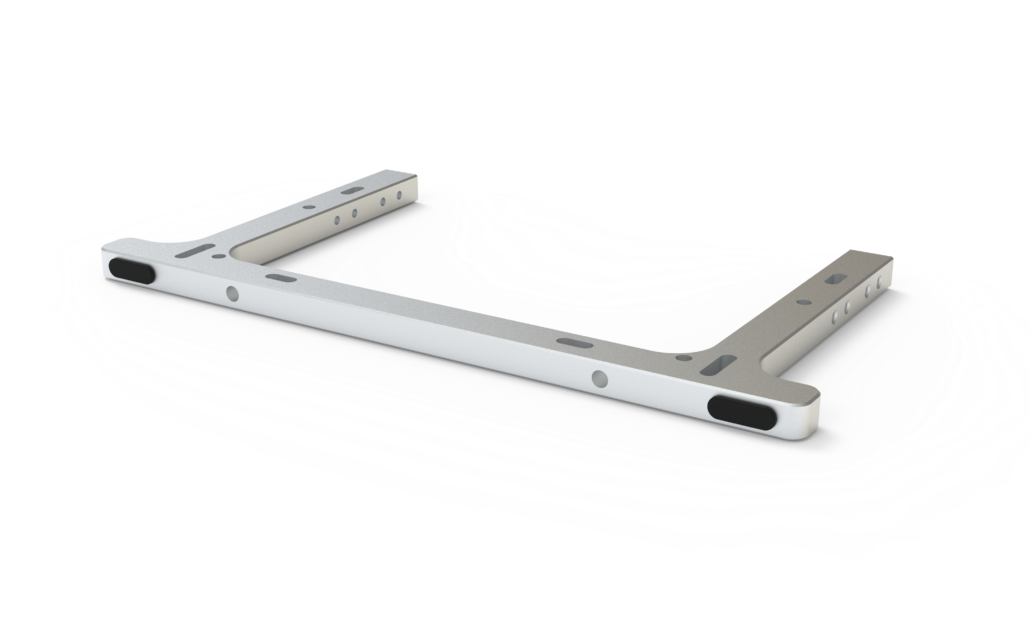
Brackets, which evolved from V1 to V1.1, continue to change. The V2 twin-design bracket allows users to mount two items (upper and lower) from a single location. This also doubles up the usable mount location on the table.
Even More New Features and Improvements
We could be talking to you about the V2 for much longer. The list of changes is extensive, so to keep it short, here are some of the other changes:
Improved rubber pads on feet
Standardized mounting hole spacing: 105mm (120mm fans) and 60mm
The Open Benchtable is now easier to disassemble and pack
Improved PSU mounting compatibility
Power/Reset button holes (12mm diameters)
Better grip with handle cutouts that make the table easier to carry horizontally
Introducing motherboard standoff clip for a more secure standoff installation
The Open Benchtable BC1 Mini V2 is available from the Open Benchtable web shop (https://openbenchtable.com/) starting from January 5, 2022 at US$199. The OBT BC1 Mini V2 is available in three colors: Black, Silver, and Titanium.
https://openbenchtable.com/wp-content/uploads/2021/11/bc1-v2-mini-asm-whw-full.png14402560Pieter-Jan Plaisierhttps://openbenchtable.com/wp-content/uploads/2017/06/logo-if-rd-330-300x107.pngPieter-Jan Plaisier2022-01-12 15:54:262022-01-12 15:54:29Open Benchtable BC1 Mini V2 Available From January 2022
With the BC1 V2 shipping worldwide, we figured that it would be the perfect time to update our assembly guide to better reflect the new features.
So, here we are with our detailed, step-by-step assembly and use guide for the Open Benchtable. This is also is our always up-to-date user-guide/manual.
The instructions provided here are valid for the V2 of the Open Benchtable. If you are still rocking a previous edition we got you covered. If you are a mini build adept, our step-by-step guide for the OBT Mini is available aswell.
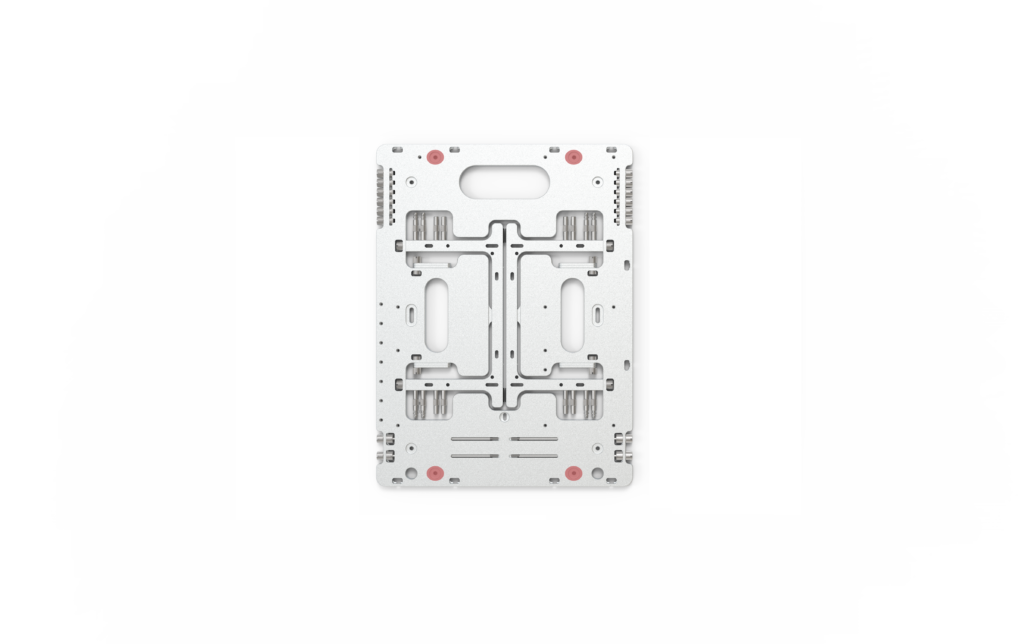
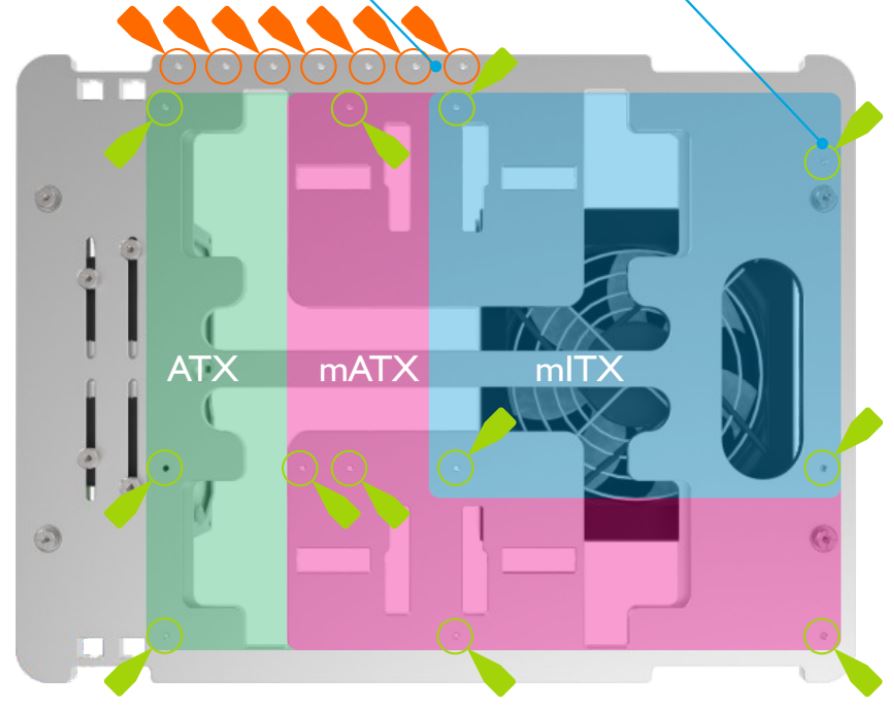
On the Open Benchtable, there is no limitation on motherboard sizes, as long as they fit some of the standard mounting holes. There is also no hard limit on the CPU cooler or GPU sizes.
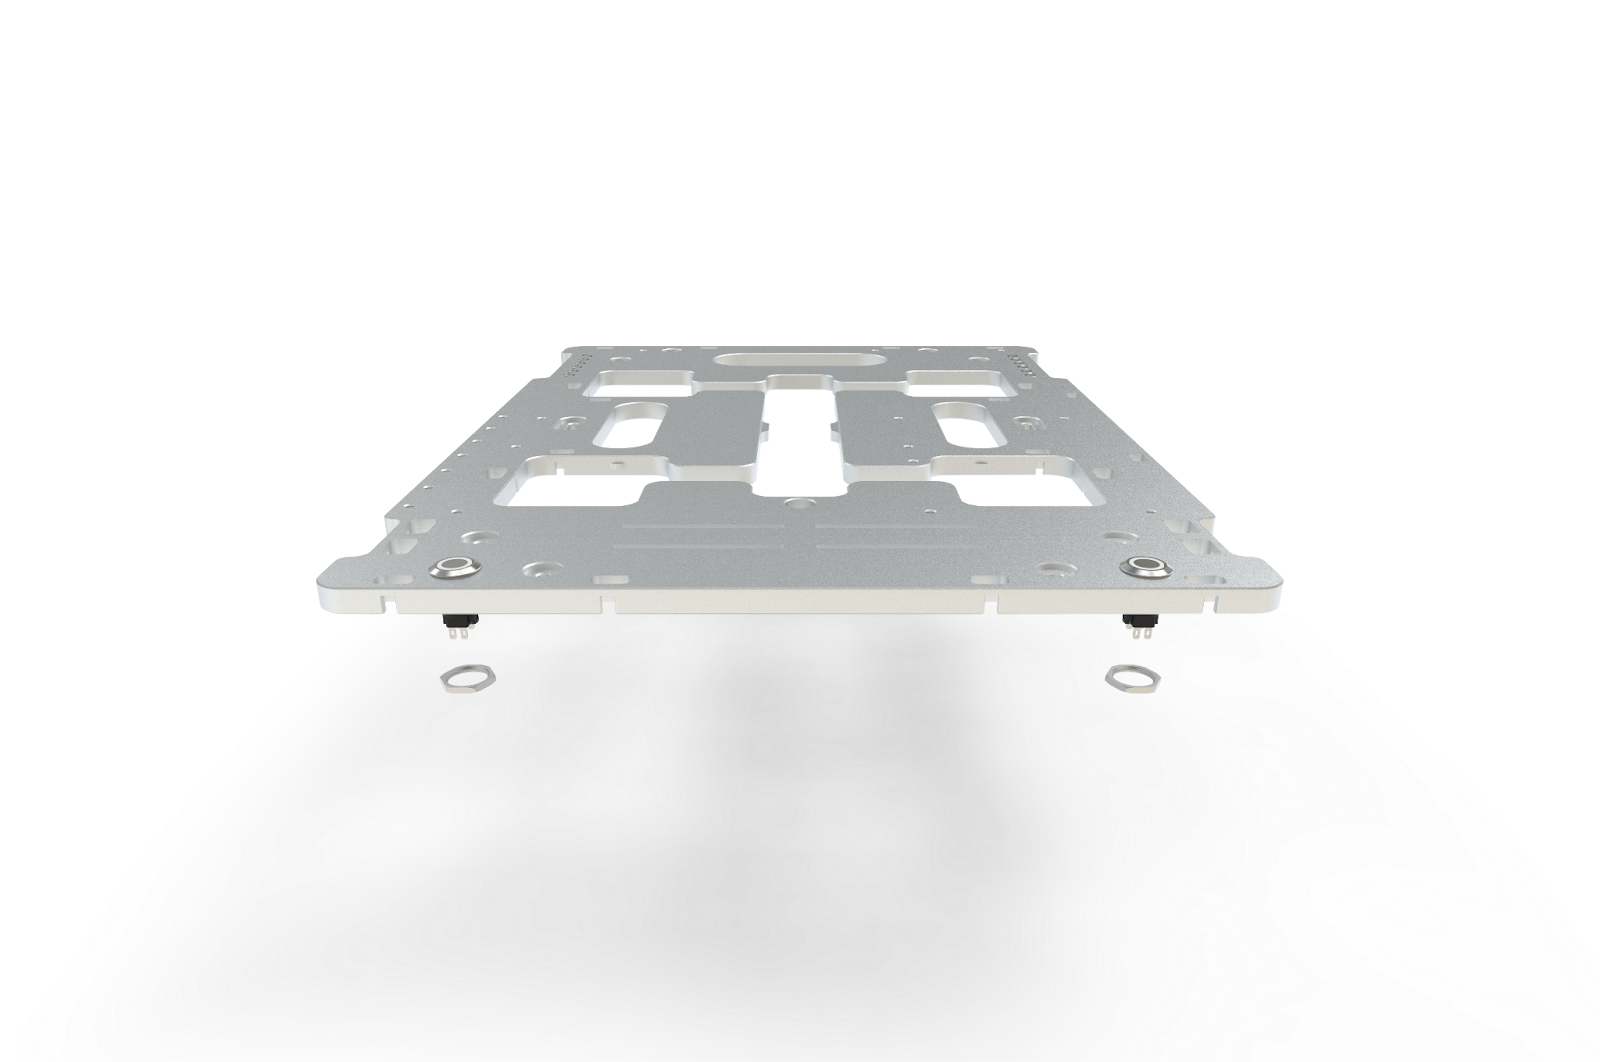
To release the feet, unscrew the four screws holding the feet to the structure. Using these screws, assemble the feet directly in the two holes on each side of the benchtable as marked in the picture below.
Detach feetAttach feet
Note that the laser engraving with the Serial number, logo and marking is always under the Open Benchtable.
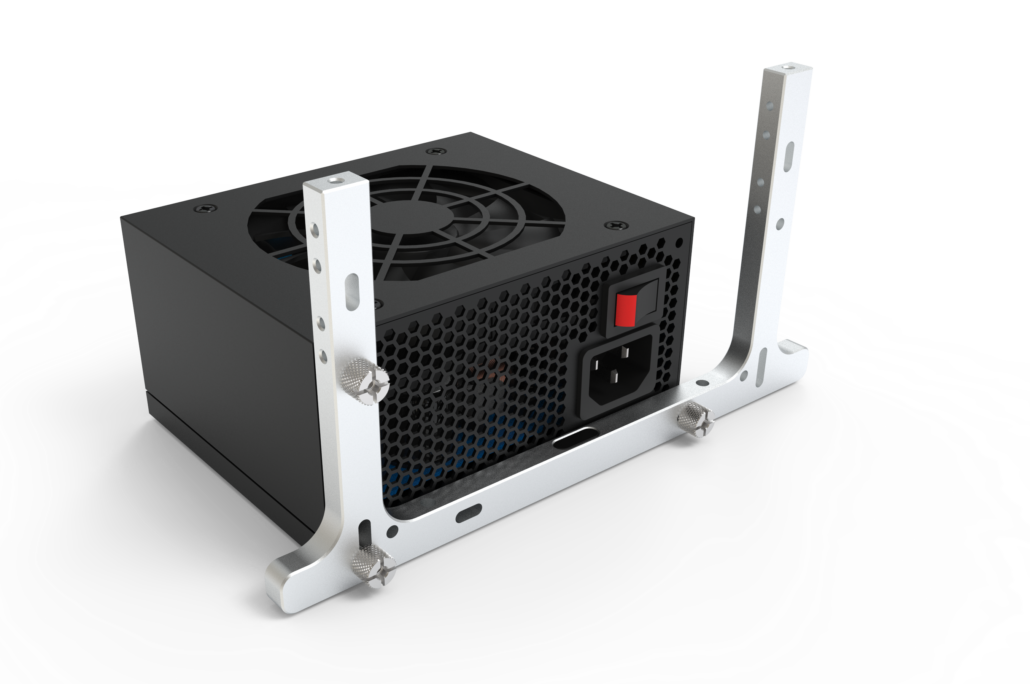
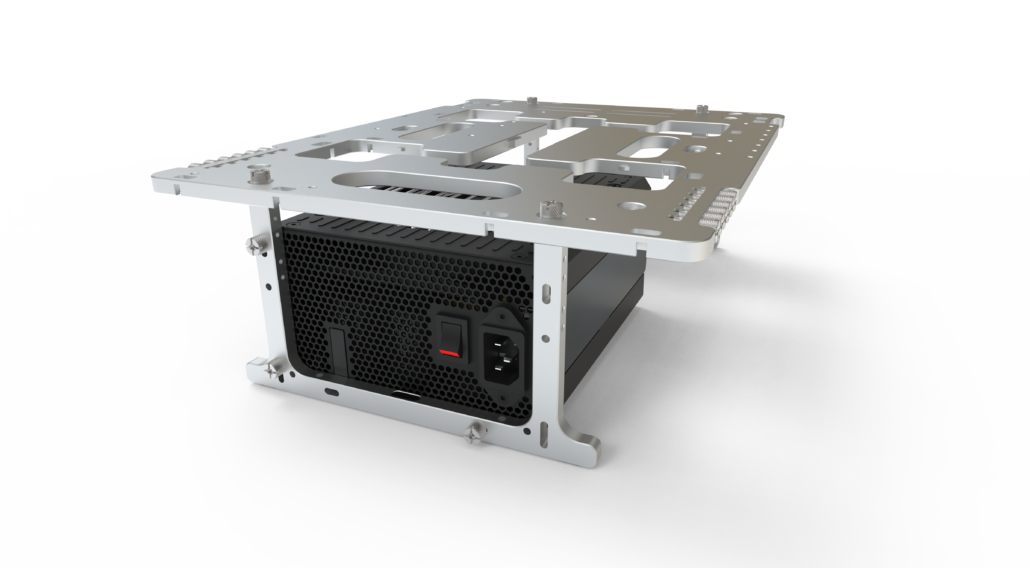
Attaching the PSU
The OBT V2 is compatible with the ATX 12V, ATX Large, ATX-EPS, BTX and now the SFX power supply formats.
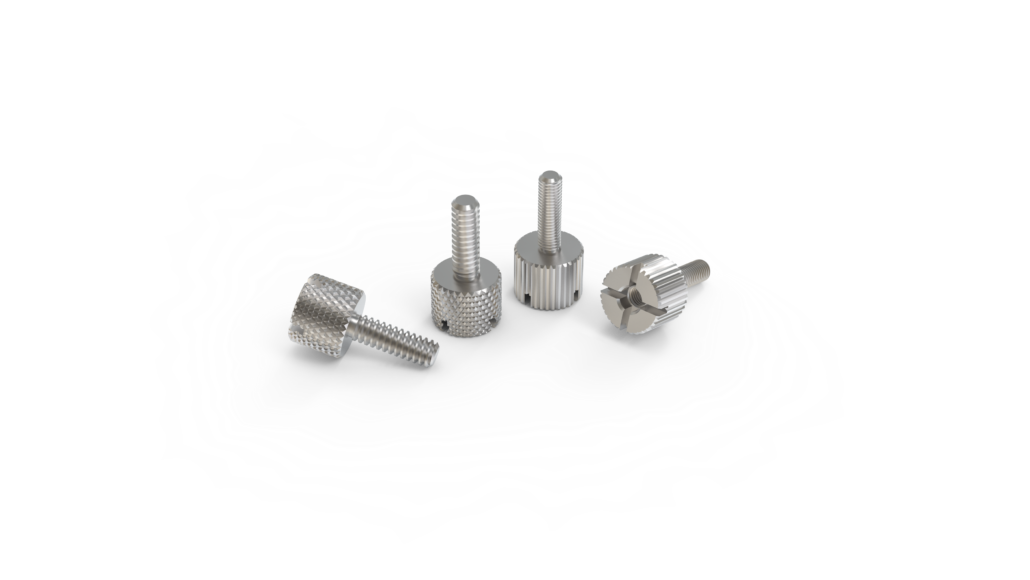
Note that the screws used for holding the PSU and the feet to the main body are 6#32 when everything else on the OBT uses M3. (NB: OBT v2 use 6#32 screws for the feet while previous version used M3)
The 6#32 screws can be found on the left side of the table, while spare M3 screws are on the right side.
The two types of screws used on the Open BenchtableTips from the team: The 6#32 screws feature a “criss-cross” pattern, while the M3 screws feature a straight pattern.
The PSU can be attached with the fan facing up or down, but it is recommended to use your PSU with the fan facing up. You will only need three 6#32 screws to hold the PSU to the Open Benchtable foot. This is the same process for ATX and SFX power supplies.
There are multiple wasy of attaching the PSU, feel free to explore possibilities.
Attach this under the top handle for better compatibility with the storage (see later).
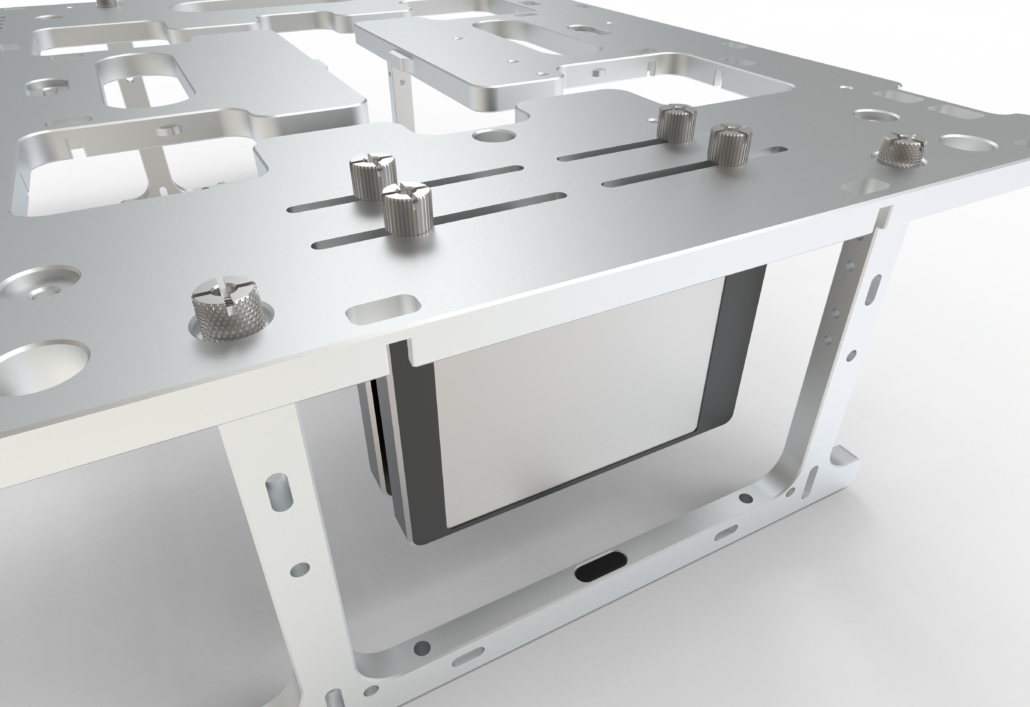
At this stage, you should mount the CPU, RAM and retention bracket for your CPU cooler.
The new support brackets can be used in a wide array of scenarios depending on how you orient them, accomodating typical 120mm , 140mm, 240mm and 280mm mounting. This help support a wide range of radiators, even large ones.
Tips from the team: In case you build with watercooling radiators or large All-In-One watercooling kits in a non-conventional approach (see the last step) : Hook your radiators before the motherboard.
Securing the motherboard
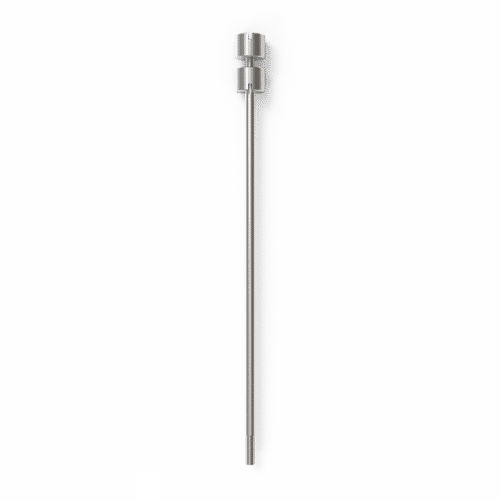
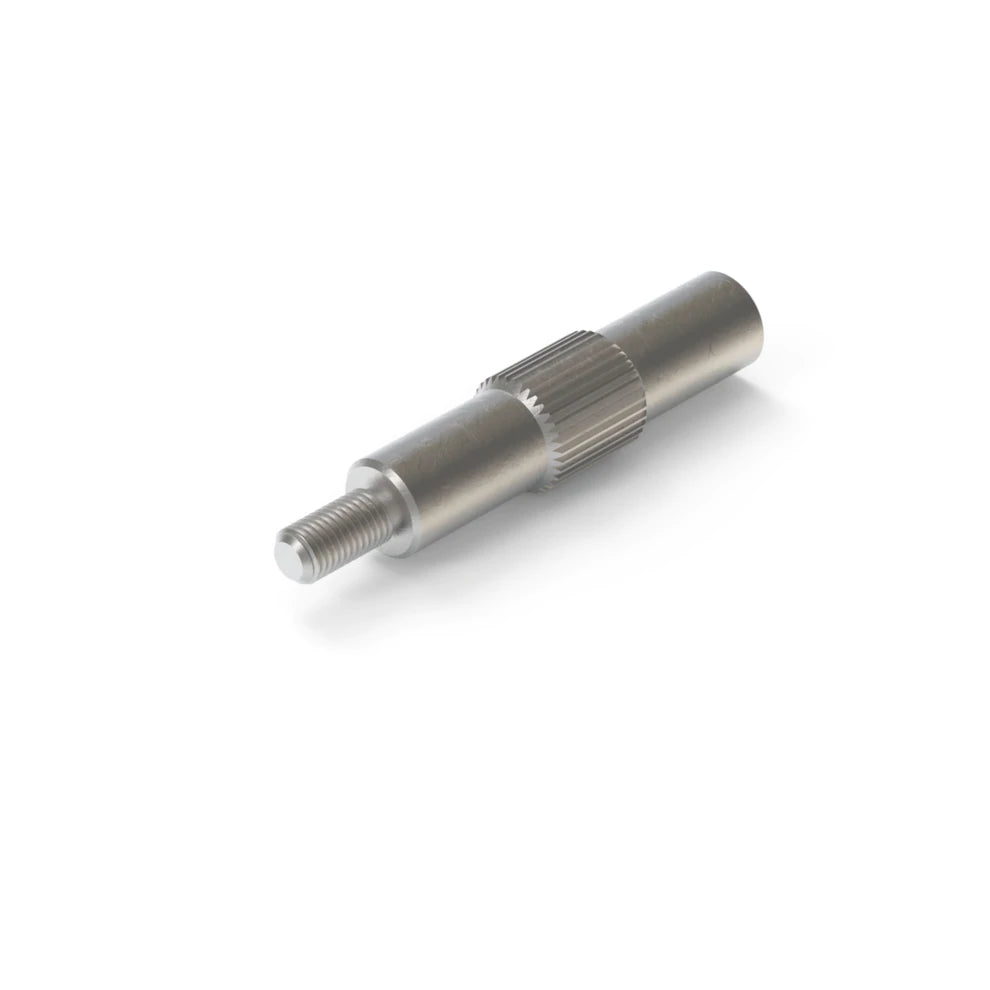
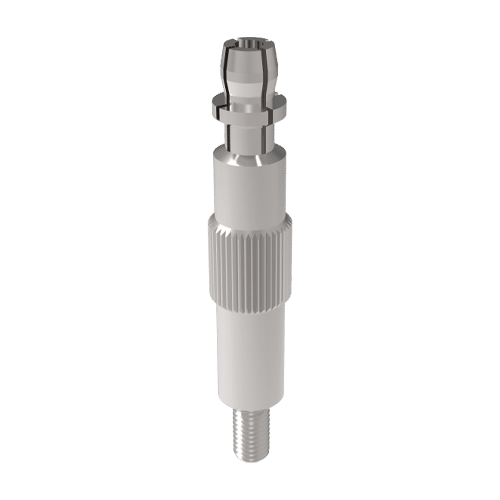
To secure your motherboard on the OBT you need the standoffs located on the feet.
There are two types of standoffs:
Push-pins : our fast mounting push-pin standoffs for motherboard support.
Screw-in : the usual screw standoffs that help you secure the motherboard and PCI-Express support rods.
You can use whichever type suits your needs best.
Attach the standoffs on the mounting point that accommodate your motherboard. You can hold the nut from under the table when attaeching them for easier tightening!
Once installed, push-pins standoffs hold your motherboard
Tips from the team: we usually go for one conventional standoff in the center and push-pins for the others!
Securing the GPU
At the bottom of the OBT frame are four PCI-E thumbscrews. For each PCI-E support, you will need a screw-type standoff (from the step above).
Attach the PCI-E thumbscrews to the standoffs, and align on your OBT to fit your GPU.
Remove the top nuts and insert your GPU, the thumbscrews should line up with the GPU. Once done, tighten the nuts onto the top of the PCI-E standoffs.
This guide will guide you through an even more detailed way to secure your GPU!
Attach storage
You can easily attach up to two storage devices at the bottom part of the OBT.
The Open Benchtable supports 2.5″ SSD or HDD of 7mm and 9.5mm z-height (thickness). You can attach a regular 3.5″ HDD as well. Use the M3 screws provided with the Open Benchtable to secure your SSDs and the 6#32 for large-size HDD .
M3 screws are easily recognizable with their straight patternYou can easily attach 2 SSDs to your OBT.If you need more help on how to mount drives, we got a tutorial for you!
Assembling accessories & AiO cooling
The Open Benchtable V2 feature a new, redesigned double bracket. Alway hook the 2 brackets to the main body, you can then use both at once for heavier items or split them in two for lighter accessories like a fan, pump or our Open Benchtable Debug Card.
With any open-air system, cable management is an important part of the final look-and-feel.
Tips from the team: Use cable ties and make use of the space between the motherboard and the OBT to route/attach/guide your cables nicely.
Bonus : Demo-Mode
The Open Benchtable V2 feature a simpler way to build a vertical system. Let’s look at the key elements of this “Demo mode”.
Attach the OBT feet with the hole at the center of the main body, and either at the top or the bottom depending of the look your want to achieve.
Before anything else, attach your PSU to the feets, this is a requirement to use the demo-mode as it provide a counter-balance for your components later down the road. When building in “Demo-mode”, make sure the unit is stable, as using undersized PSU and oversized GPUs or coolers could unbalance the build.
Demo-ModeDemo-Mode flipped
Secret feature : Wall-Mount
Yes, you can! How?
In each feet there are 2 extras holes (see below), they can be used to screw the whole rig to a wall or… anything else.
This concludes our Open Benchtable V2 assembly guide. We would love to see what you build on your Open Benchtable.
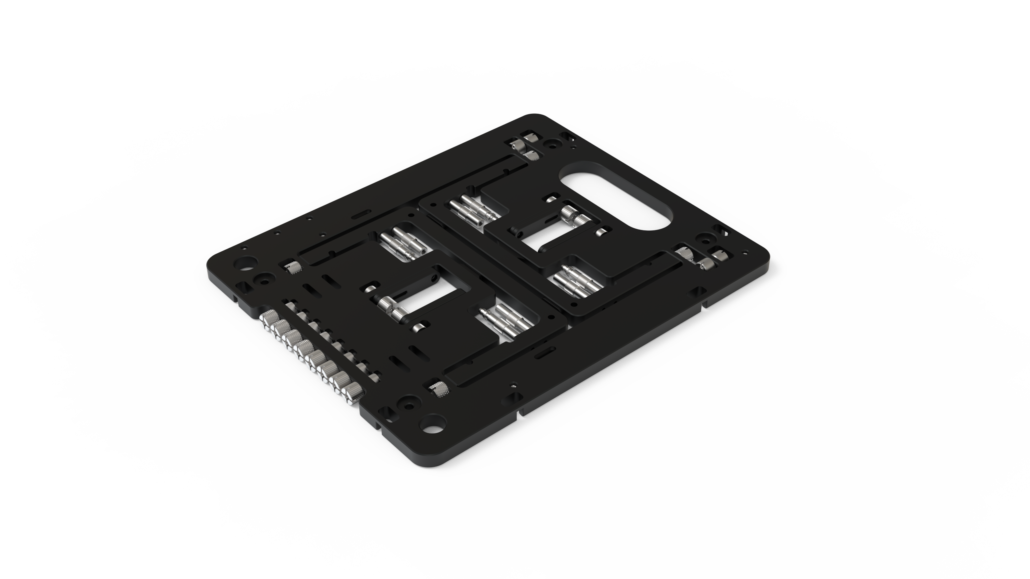
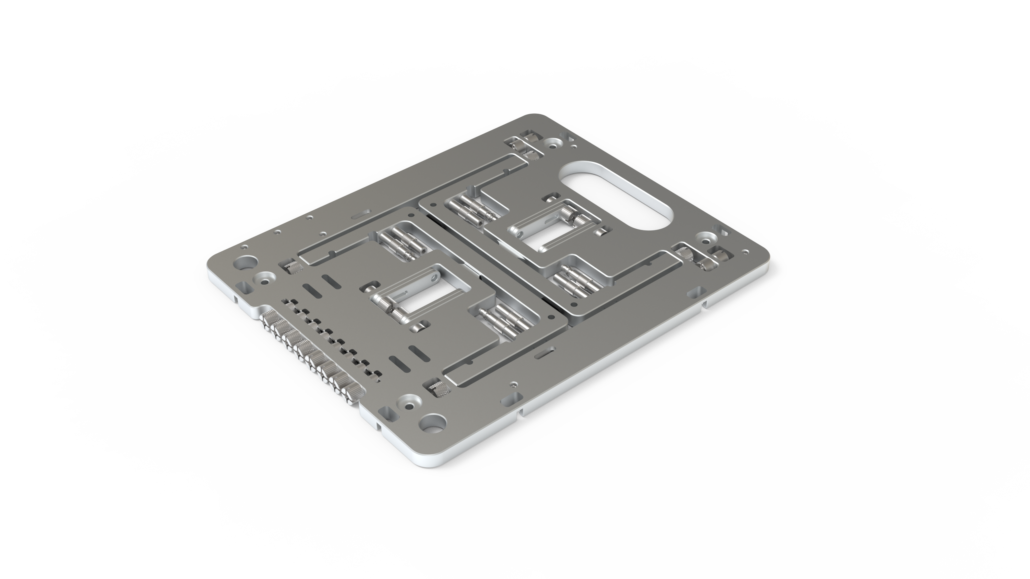
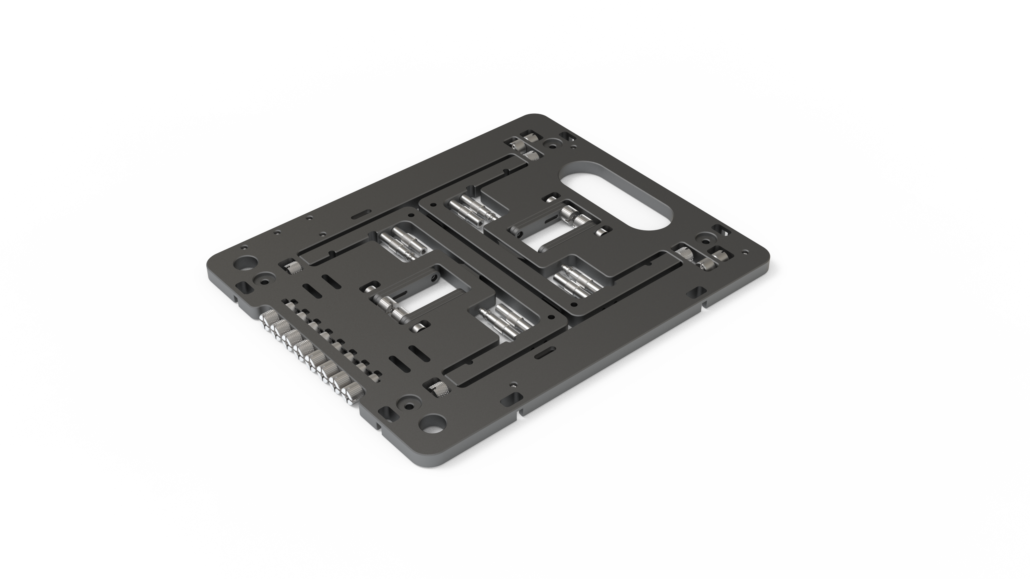
The Open Benchtable BC1 V2 is the most significant iteration of the Open Benchtable and sports a variety of new features such as vertical Demo Mode as well as many feature improvements.
November 3, 2021 – Open Benchtable and Streacom are delighted to announce the latest iteration of the Open Benchtable BC1. The Open Benchtable BC1 V2 is the most significant update to the design since its inception and incorporates new features, design improvements, and many feedbacks from our community and customers.
The Open Benchtable BC1 V2 will replace the existing V1.1 design and comes in 3 colors: Black, Silver, and Titanium.
About Open Benchtable
It’s been quite the Open Benchtable journey from the first conversations in June 2015 at the Computex trade show, over the prototypes tested during the 2016 HWBOT World Tour, to our latest V2 iteration launching in the fourth quarter of 2021.
We are proud to say that during our many interactions with customers, supporters, enthusiasts, PC DIY aficionados, industry partners, and system builders around the world, we have learned so much about everything that makes the Open Benchtable great and all the things it wasn’t so great at yet.
We’re never shy to accept feedback, good or bad, and always look to improve the Open Benchtable product family. As you’ll find out in the sections below, the Open Benchtable underwent quite a transformation from the 2016 V0.1 to our 2021 V2. For V2 we incorporated as much of the feedback as possible to develop the best Open Benchtable to date.
In our admittedly slightly biased opinion, the result is simply spectacular. The new Open Benchtable BC1 V2 is designed to be more robust, simpler, and more practical to use for everyday PC enthusiasts.
Open Benchtable BC1 V2 Product Features
Although the OBT BC1 V2 has undergone a significant re-design, it was important to stay true to the winning formula and maintain design continuity. The footprint, size, look, and construction will feel entirely familiar to current users and the custom screws will still work on all versions
Built To Last
As with every iteration of the Open Benchtable, the Open Benchtable BC1 V2 is built to last.
We have implemented several small design revisions which will help further extend the lifespan of the benchtable itself. We also meticulously evaluated the entire supply chain process to not only incorporate lower-waste processes but also overall reduce the environmental impact of the Open Benchtable production.
The Built To Last attitude doesn’t just apply to the Open Benchtable products; it also applies to our planet. Therefore, Open Benchtable joins our partner Streacom in its commitment to offset the environmental impact by reducing waste from smarter packaging and their partnership with the Eden Reforestation Project.
Vertical Demo Mode
A large portion of the Open Benchtable users is die-hard PC enthusiasts. Their unconditional love for computer hardware drives the unstoppable urge to showcase their gear. Another important target audience is YouTubers and influencers who use the Open Benchtable to showcase the products they test and talk about.
The Open Benchtable BC1 V2 incorporates support for a vertical Demo Mode which allows users to set up their Open Benchtable upright. No life hacks are needed, no dodgy prop-up solution is needed to make your gear stand out to all.
Upgraded Screws, Re-Designed Brackets, and Enhanced Usability
Since its inception, the Open Benchtable has been using the same nuts and screws. While we’ve kept all of the assembly 100% toolless, this significant upgrade improves the V2 durability and long-term use.
To further improve durability, we removed threads made directly into the side of the benchtable. Not only does the screw+nut design ensure all mounting points on the table are much stronger, but also, replacement, in case of damage to the thread, is now possible. Users that mount heavy hardware or require ultra-tight mount can now apply high torque with tools to securely mount anything to the table.
Brackets, which evolved from V1 to V1.1, continue to change. The V2 twin-design bracket allows users to mount two items (upper and lower) from a single location. This also doubles up the usable mount location on the table.
We also included a much-requested feature by our community: a location to mount the Power On button. These two 12mm holes carved in the table give users that do not have power and reset buttons on-board a solution to add their own.
Even More New Features and Improvements
We could be talking to you about the V2 for much longer. The list of changes is extensive, so to keep it short, here are some of the other changes:
Added support for SFX PSUs
Improved rubber pads on feet
Standardized mounting hole spacing: 105mm (120mm fans) and 60mm
The Open Benchtable is now easier to disassemble and pack
Improved PSU mounting compatibility
Better grip with handle cutouts that make the table easier to carry horizontally
Introducing motherboard standoff clip for a more secure standoff installation
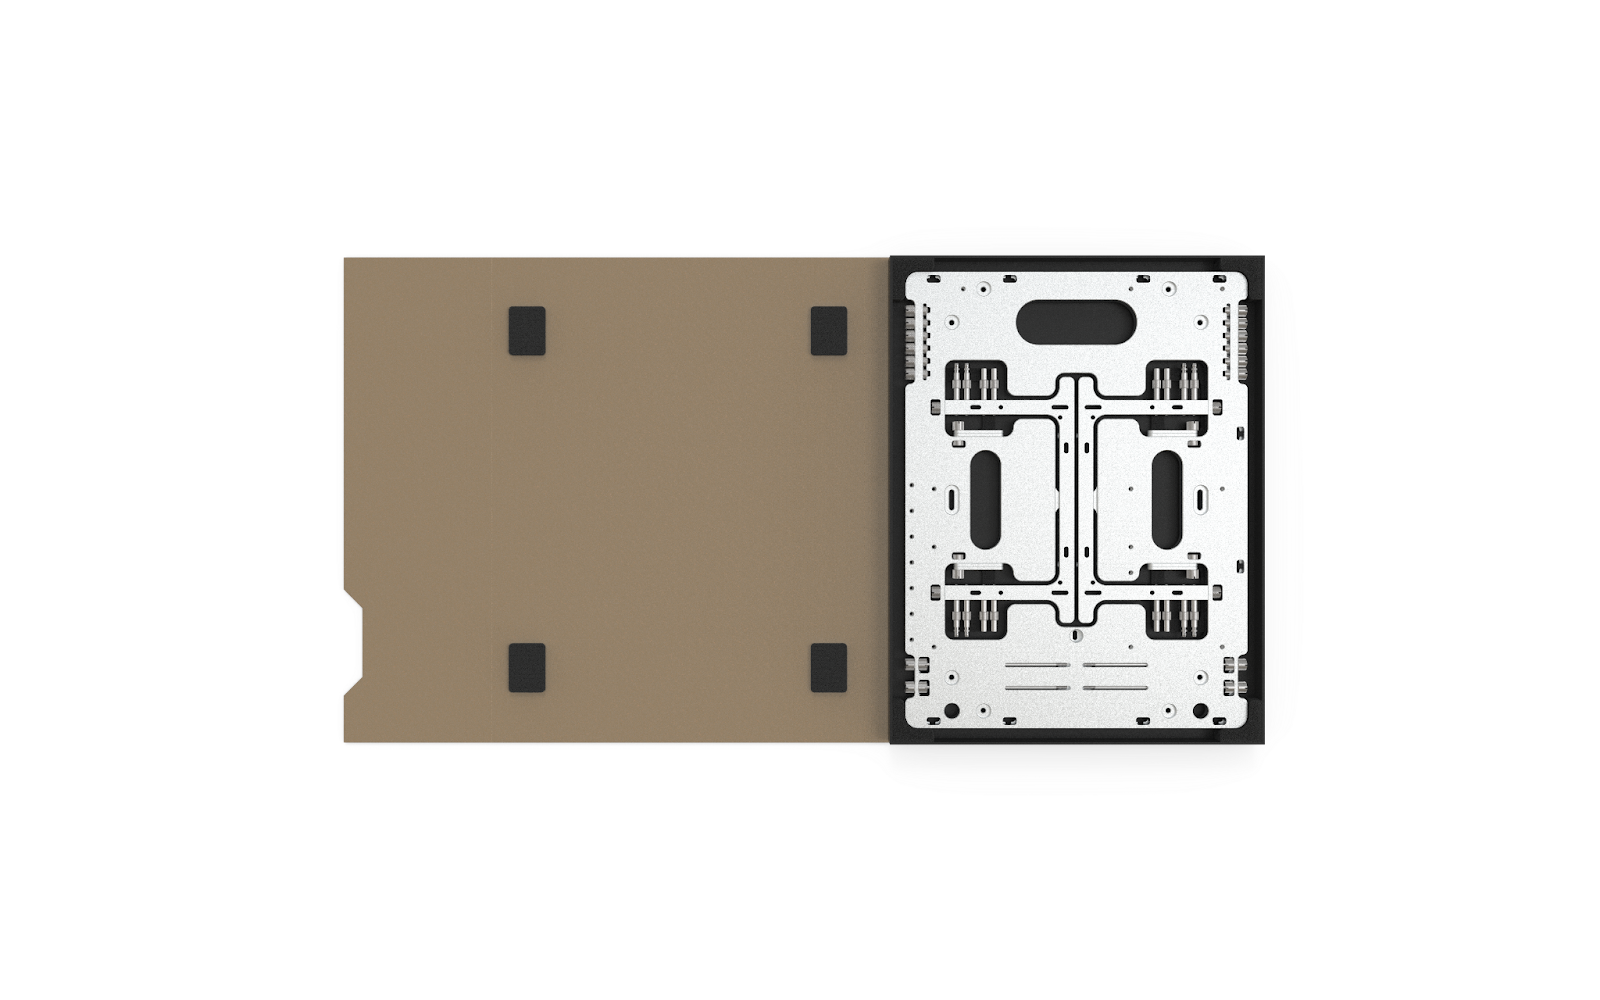
New redesigned Sleeve – Exclusively on Openbenchtable.com
Orders on the official Open Benchtable webshop at openbenchtable.com will come with an exclusive and totally redesigned sleeve.
Open Benchtable BC1 Mini V2
In addition to the OBT BC1 V2, today we are also announcing the Open Benchtable BC1 Mini V2. The Mini is the ITX small-form-factor version of the ATX-size BC1.
The majority of the feature improvements of OBT V2 have carried over to the OBT Mini V2, including improved storage and assembly procedure, wider SFX PSU compatibility, upgraded feet, more versatile brackets, power/reset switch mounting holes, new screws, more robust build and the new packaging that also goes to planting more trees.
Open Benchtable V2 Pricing and Availability
The Open Benchtable BC1 V2 is available from the Open Benchtable web shop (https://openbenchtable.com/) starting from November 3, 2021 at US$199. The Open Benchtable BC1 Mini V2 will be available in Q1 2022 at US$179.
Both the OBT BC1 V2 and OBT BC1 Mini V2 will be available in three colors: Black, Silver, and Titanium.
https://openbenchtable.com/wp-content/uploads/2021/11/obt-standing-vs-flat-transparent.png16002560Pieter-Jan Plaisierhttps://openbenchtable.com/wp-content/uploads/2017/06/logo-if-rd-330-300x107.pngPieter-Jan Plaisier2021-11-03 04:20:002022-01-12 15:54:04Open Benchtable BC1 V2 Available Now
This is part of our series of how-to & guide about the Open Benchtable and the Open Benchtable Mini. Today we focus on mounting a motherboard on your Open Benchable.
Getting ready
The Open Benchtable is compatible with pretty much all the common form-factors: Mini-ITX, Micro-ATX, ATX, E-ATX and XL-ATX.
The Open Benchtable Mini is compatible with the Mini-ITX (and some Mini-DTX) form factor.
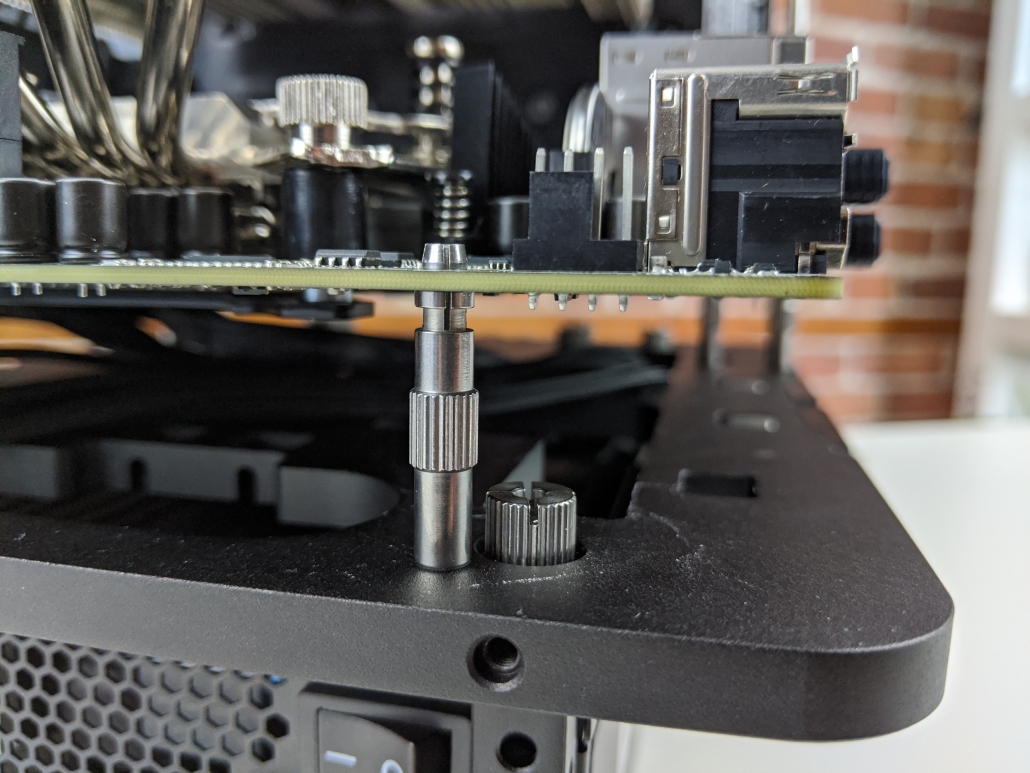
To start, get the number of stand-off that you need from their storage location. ATX & Micro-ATX form factor requires up-to nine and Mini-ITX requires four.
As mentioned in our mounting guides, there are two types of stand-offs and they can be mixed. Half of them are push-pin standoff while the other half is made of screw standoffs (these are similar to the conventional standoffs you find in most cases). All of the standoffs are stored in the feet of your OBT.
If you are using screw standoffs, get the same amount of M3 screws off, there are located on the right of your OBT.
Tips from the team: we usually go for one conventional standoff in the center and push-pins for all of the others! (you can mix push-pin and screw-standoffs that you feel comfortable with).
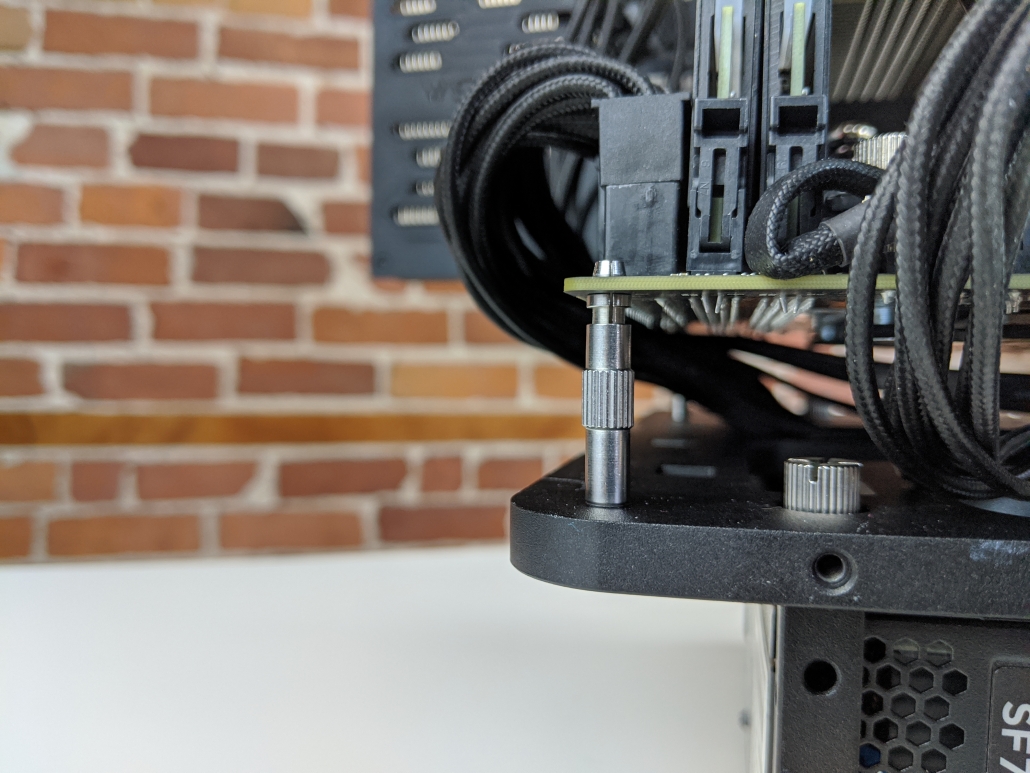
Motherboard Mounting
Once you’re all set up, install your standoff so they align with your motherboard (green locations).
Use the pattern which corresponds to your motherboard
If you are using conventional standoffs, tighten your M3 screws in them to secure the motherboard.
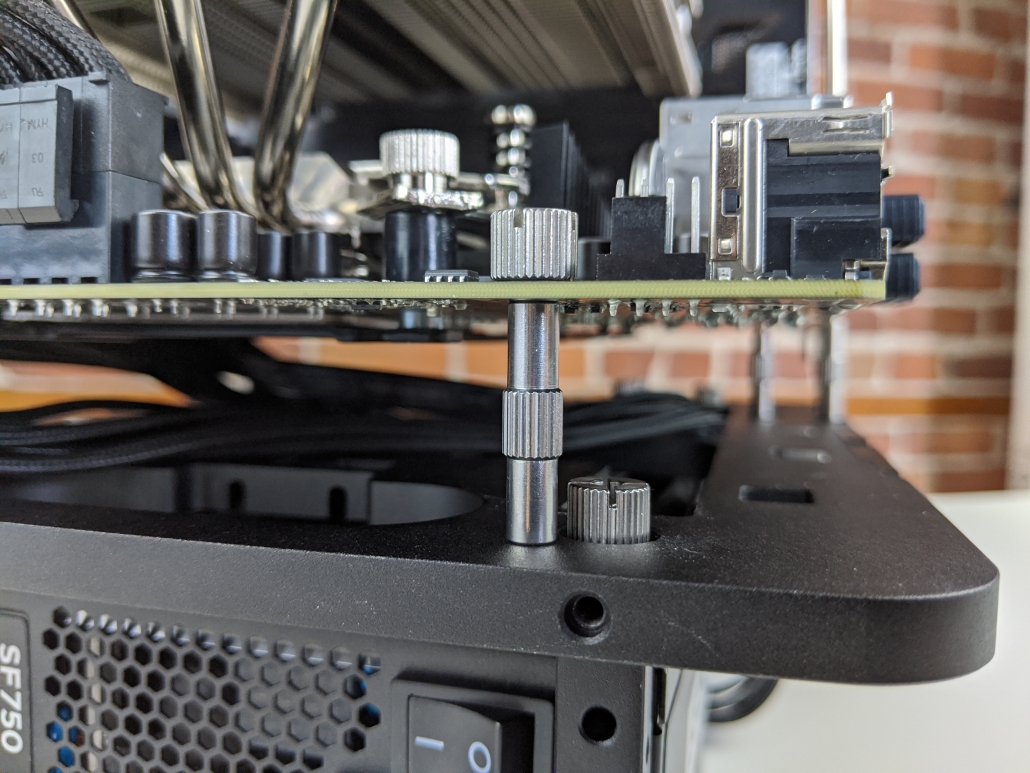
Usign the Open Benchtable Mini is even easier, you only need 4 standoffs
Push-pin standoff
Push-pin standoff
Standoff with OBT thumbscrew
Let us know on Social Media what is your favorite mounting strategy: Push-pins only or Mixed ?
https://openbenchtable.com/wp-content/uploads/2021/08/OBT-standoff-2-scaled.jpg19202560Thomas Domarthttps://openbenchtable.com/wp-content/uploads/2017/06/logo-if-rd-330-300x107.pngThomas Domart2021-08-18 06:55:002021-08-20 02:17:41Motherboard mounting guide for Open Benchtable and OBT Mini
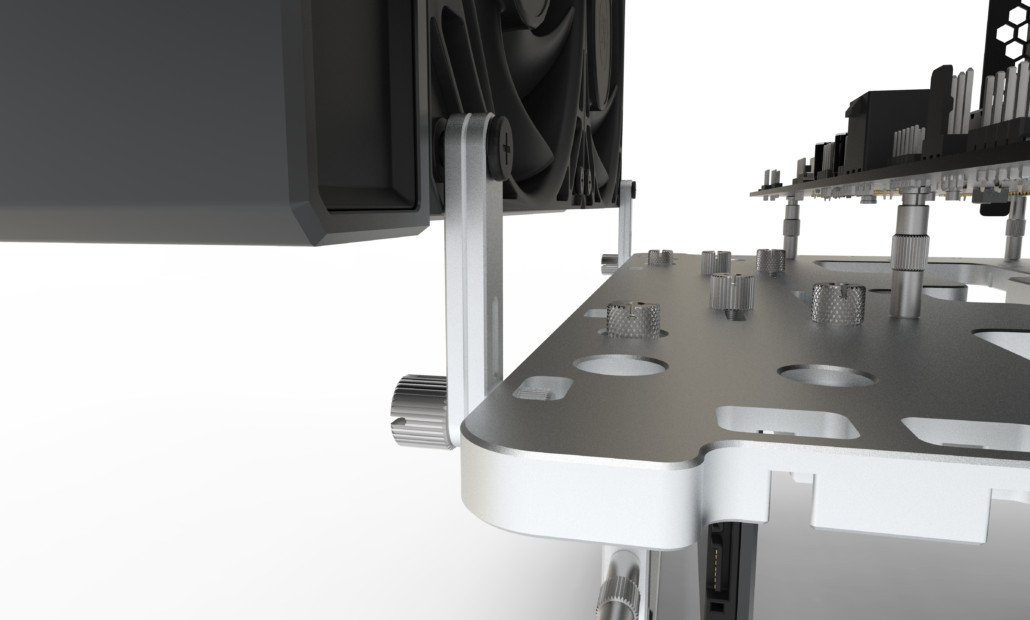
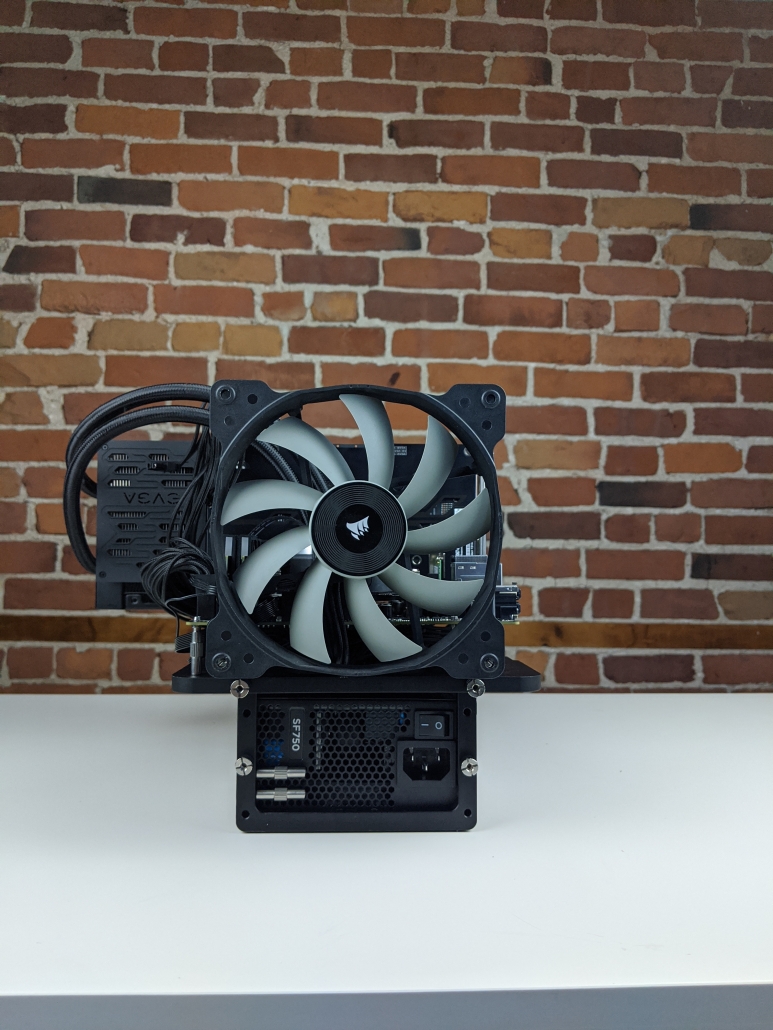
Even if the OBT is easy to build, sometimes we just want to check how things should be worked out. Today we focus on installing fans on your Open Benchtable.
Getting ready
To mount your fan, you will need to detach four M3 screws, two brackets and optionnally two washers.
In the middle of your OBT, you fill find your brackets, they are attached with one M3 screw each. Unscrew these to get the brackets off. Washers are securely held with the PCI-E thumbscrews, unscrew the nuts and you will find your washers! You can then find two more M3 screws on the right side of your OBT or in your OBT Screw Kit.
Tip from the team: Washers are optional, they are here to prevent any friction between the two aluminum parts which can leave esthetic marks.
Installation
While fans all have the same mouting point & dimension, not all fans are created equal. Thus we outline the two common way to mount your fans to the brackets.
Case 1: Your fan can fit a screw through its mount
This is the easiest case! First, pass a M3 screw through the corner of your fan. Next, screw it the middle hole of the bracket. Finally, use your spare M3 screws to secure the brackets to the holes which are located on the edge of your Open Benchtable.
Tip from the team: The bracket has two different thicknesses on it to accomodate most configurations possible. Play with the brackets to find the best fitting position.
Case 2: Your fan can’t fit a screw through its mounts
There are two ways to tackle it. You can use third party screws and nuts or use third party extra long M3 screws.
Using screws and nuts
When using screws and nuts, pass the screws through your fan’s mounting point and bracket, then tighten the nuts. Finally, use M3 screws to attach the brackets in the holes located on the edge of the Open Benchtable.
Using extra-long M3 screws
When using extra long M3 screws, pass them through the fan’s mounting points. Next, use the middle hole of the bracket as a nut to attach the screw in it. Finally, use your OBT M3 thumbscrews to secure the brackets to the edge of your OBT.
Connect!
Finish by connecting your fan to your motherboard or fan controller.
Theses are awesomes builds by the community to inspire you.
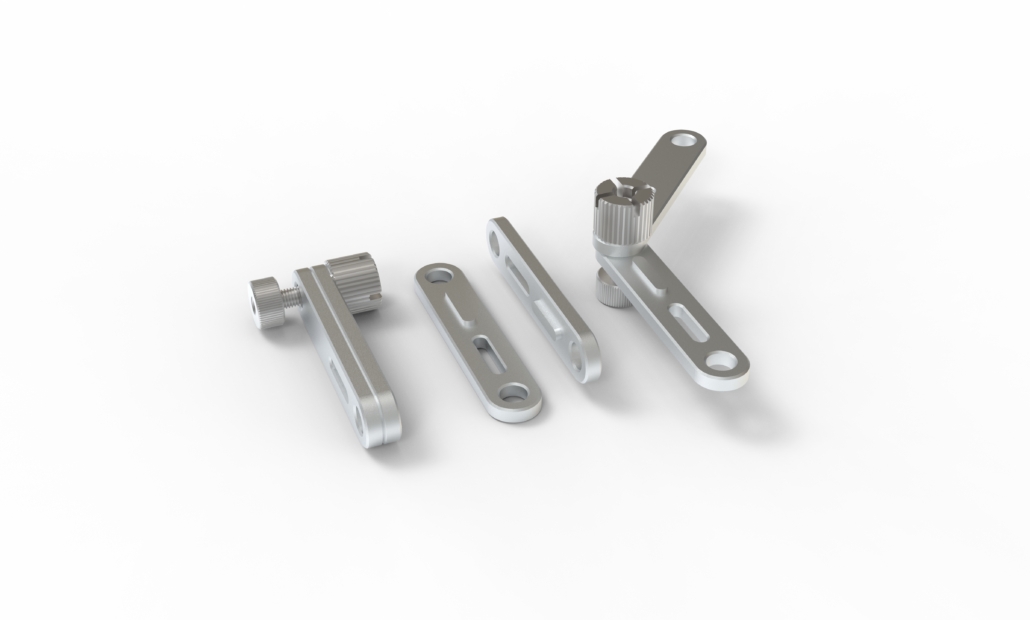
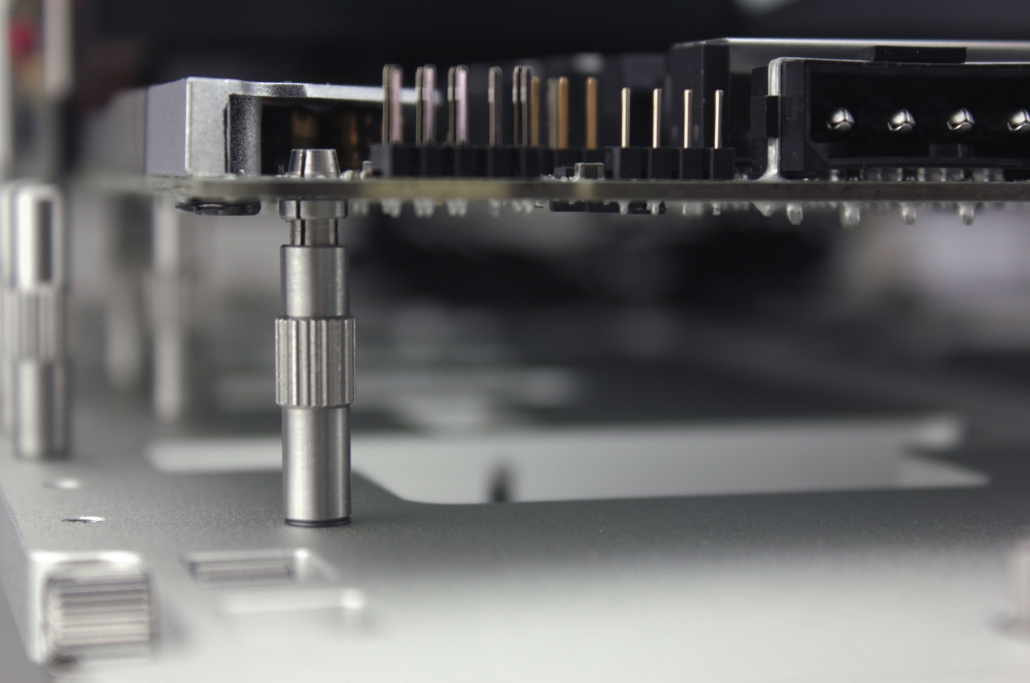
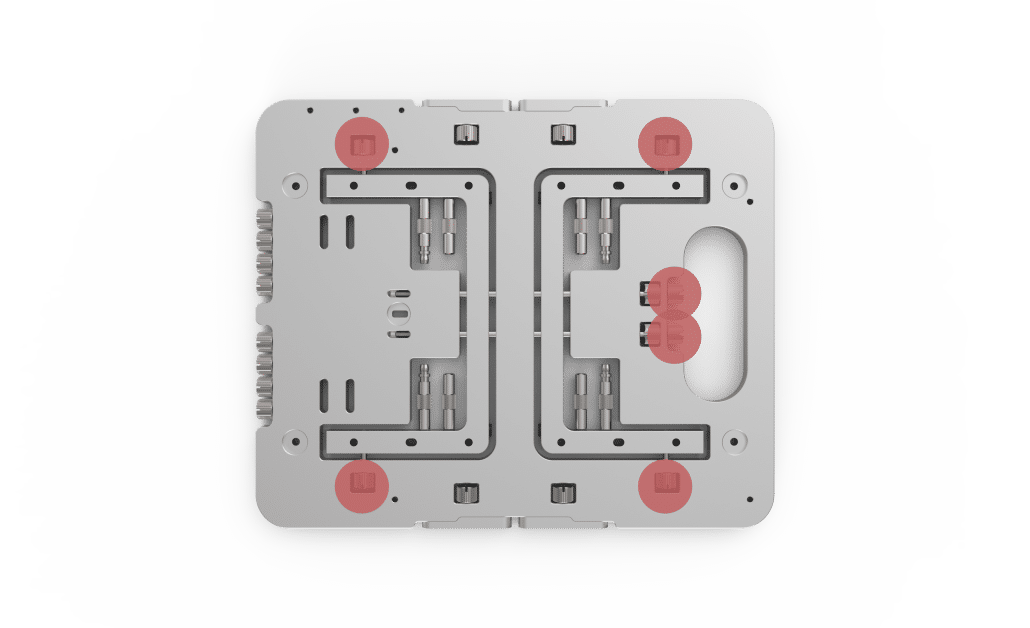
Even if the Open Benchtable is easy to build, sometimes we just want to check how things should work out. Today we focus on installing any sort of full sized extension card, such as a GPU or Capture Card.
Getting ready
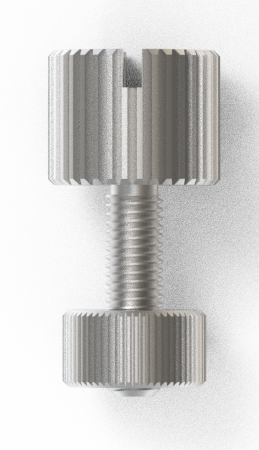
First, get the PCI-E thumb screws out.
If you are using the OBT, four PCI-E standoffs are included. To get them out, simply loosen the thumbscrew and they will detach easily.
If you are using an OBT Mini, two PCI-E standoffs are included with your unit. To get them out, you need to unlock the feet. Loosen the 6 screws highlighted in the picture below. Then get the PCI-E standoffs by sliding them out of the feet.
A video is worth a thousand words.
Loosen the highlighted screws
Use the required number of PCI-E standoffs, and store the remaining in their original location.
If you are using a large number of PCI-Express cards and require extra PCI-Express standoffs, consider getting an OBT Screw Kit.
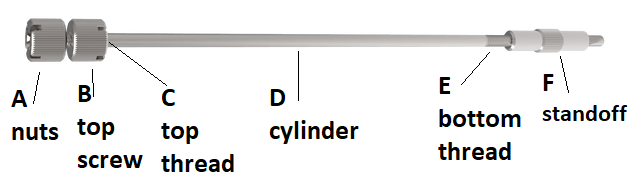
Installation
Once you’re all set-up, screw the bottom thread of the PCI-E standoff to the screw standoff. Find the screw standoff attached to the OBT feet. Repeat this process on all the standoffs you plan to use.
You should get something like this
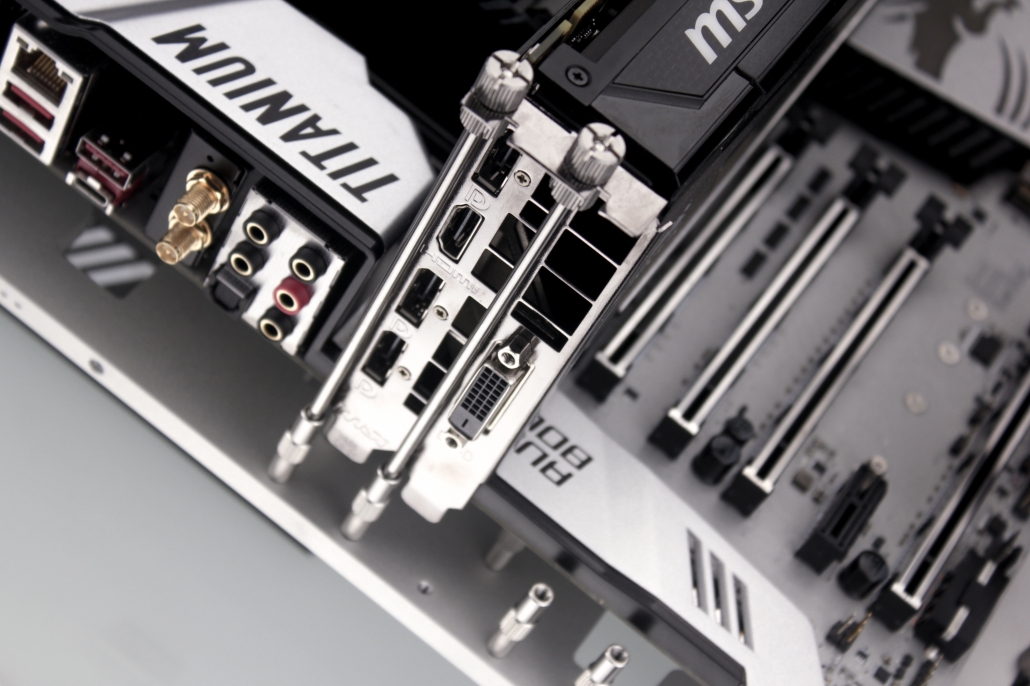
Now that everything is ready, mount your PCI-E standoffs in the holes that correspond to the PCI-E slot of your motherboard.
Plug your PCI-Express card. Tighten the nuts on the top screws. All done!
Tips from the team: Some cables with large display port connectors, might need a bit more wiggle room with the standoffs. In this case, play with the top nuts to adjust position and alignment.
Let us know on social media what other guides you want to see for your Open Benchtable!